Avoid the Travel Trap & Pack Your Snacks

If you have a job like mine where you travel regularly, it can be hard to maintain a healthy diet when it comes time to hit the road (or skies). You no longer have the guarantee of a refrigerator to store fresh food, a good grocery store to purchase fruits and veggies, or a stove to prepare your own meals. Most of the time you will be forced to eat out and make the best choices possible. One way to avoid ordering a massive meal every time you sit down is to bring along your own snacks. Keeping tasty and nutritious snacks on hand will help keep you satisfied in between meals so you don’t become blinded by hunger, throwing your normally healthy habits out the door. Below are some of my favorite snacks to pick up before a long plane ride (such as the one I’m on as you’re reading this) or a day of racing around to different meetings with no time for a break.

photo

To honor spring and healthy, beautiful skin, I packed these tasty detoxifying snacks:

1. Pepitas: Also known as pumpkin seeds, pepitas are one of my go-tos for skin detox. Pumpkin seeds are packed with the beautifying mineral, zinc, and essential fatty acids including omegas 3, 6, and 9. They also help reduce inflammation in the body.

Go for the raw, unsalted variety to get all the benefits without any added down-sides.

2. Edamame Hummus w/ Baby Carrots and Radishes: Baby Carrots are plentiful in skin-beautifying Vitamin A in the form of beta-carotene. Vitamin A is found in many skin creams and treatments in the form of retinol, but ingesting it is still the best way to get that glow from the inside out.  Radishes are high in sulfur, silicon, and Vitamin C, which work together to boost collagen, strengthen skin, and stimulate the circulatory system. And Edamame Hummus from Trader Joe’s? Well that’s just darn tasty.

3. KIND Bars: I love KIND Bars because they are gluten-free, and most varieties are also wheat- and dairy-free. They are non-GMO, have simple and natural ingredients, and boast at least 5g of dietary fiber (approximately 20% of your RDA). They are delicious and more satisfying than chalky protein bars with a million ingredients.

So before your next trip, stock up on the good stuff and arrive at your destination feeling a heck of a lot better than if you’d gone for that blueberry muffin or five-dollar foot-long.

Cherry Cashew Power Bites


If you’re like me and you’re always on the go, it can get hard to eat three healthy meals a day let alone snacks. Healthy eating takes planning. To help you incorporate more whole foods into your busy lifestyle  I’ve come up with an easy snack recipe that you can make on the weekend, store in the fridge and enjoy for the next 10 days.

IMG_3626

These Cherry Cashew Power Bites are perfect for pre-workout fuel because they’re a balanced combination of fat/protein/carbs that will keep you energized but not overly full (which can detract from the task at hand). Every ingredient is a whole food that your grandma would recognize. Best of all, there’s no added sugar so you don’t run the risk of a glycemic spike and resulting crash.

If you’re not a fan of dried cherries, opt for dried mango or wild blueberries–just make sure they are unsweetened and unsulphured.

*************************

CHERRY CASHEW POWER BITES

 What You’ll Need:

  • 2/3 cup raw cashews
  • 1 cup  dried dark cherries (unsweetened)
  • ½ cup unsweetened shredded coconut, plus more for garnish
  • seeds of 1 vanilla bean
  • 1/2 tbs lime zest
  • 1/4 tsp sea salt
  • 1/4 tsp turmeric (optional)
  • 1/4 tsp chili powder (optional)

How to Make Them:

1. Soak cashews for 3-4 hours. Drain and rinse.
2. Soak cherries for 20-30 minutes until slightly softened and plump.

IMG_3624
3. Combine all ingredients in a food processor and pulse until a sticky dough is formed.

IMG_3625
4. Use a teaspoon to spoon out enough to make a 1″ ball. Squeeze the dough in your palm to bring it together and roll between your palms until you get a nice ball.
5. Roll in shredded coconut to coat.

Recipe makes approximately 20 power bites. Store in the fridge for up to 2 weeks.

At approximately 110 calories per ball. I like to snack on one or two of these 30 minutes to an hour before I workout. They give me the energy my body needs to move and play but don’t weigh me down.

Turmeric and Thyme Baked Potato Chips

If you follow health news, you’ve probably been inundated by now with revived exuberance for the Mediterranean diet [exhibit A, B and C]. Last month the New York Times reported, “About 30 percent of heart attacks, strokes and deaths from heart disease can be prevented in people at high risk if they switch to a Mediterranean diet rich in olive oil, nuts, beans, fish, fruits and vegetables, and even drink wine with meals.” The study yielding these impressive results was even cut short because the results were so decisive that researchers found it unethical to continue.

To me, this diet just plain makes sense. Why? Because it’s not really a diet, it’s a lifestyle, and one that is pretty easy to maintain. Unlike other diets, the Mediterranean diet is not very restrictive and has a vast array of menu options to keep you interested and satisfied for the long haul. I would, however, add whole grains into the mix as they’re an important part of a well-balanced diet. Additionally, I encourage anyone without a lactose  allergy to fit in some low-to-no fat dairy products. This is especially important for women as we need anywhere from 1,000 to 1,200 milligrams of calcium each day.

The bottom line for a healthy heart and happy stomach: pick up some good olive oil, lay off the red meat (for the most part), enjoy some delicious salmon with a side of asparagus, and grab yourself a glass of wine. I think I could get used to this kind of lifestyle.

And finally, in the spirit of the Mediterranean diet, here is a great snack and/or appetizer recipe for you to try. Buon appetito!

IMG_3555

Turmeric & Thyme Baked Potato Chips

What You’ll Need:

  • 2 tbs olive oil
  • 1 tsp ground turmeric
  • 1 tsp dried thyme leaves
  •  1/2 – 1 tsp sea salt
  • 1/4 – 1/2 tsp ground cayenne
  • 6-8 organic red-skinned potatoes (each about the size of two golf balls)

How to Make Them:

  1. Pre-heat oven to 400°F
  2. Slice potatoes 1/8″ or slightly thinner on a mandoline.
  3. Toss potatoes with all other ingredients in a large bowl.
  4. Arrange slices in a single layer on a cooling rack set atop a baking sheet (this allows air to crisp the chips 360°)
  5. Bake for 20 min, flip, then bake another 20 min.

[Serves 6-8 as an appetizer; approx 160 cal per person]

I like to pair them with Trader Joe’s Cowboy Caviar or a nice mixed olive tapenade. These would make a great app for any dinner party, potluck or tailgate.

Soba Noodle Stir-Fry w/ Sirloin, Shiitake Mushrooms & Goji Berries

Goji berries are a Himalayan superfood used for 6,000 years by herbalists in China, Tibet and India to safeguard the liver, prevent macular degeneration, improve sexual function and fertility, boost the immune system, increase circulation, and promote a long and happy life. These lofty health claims are rooted in facts. These sweet/tart berries are rich in antioxidants, particularly the carotenoids beta-carotene and zeaxanthin. Zeaxanthin helps protect your eye’s retina by absorbing blue light and may decrease the risk of developing age-related macular degeneration (AMD), the leading cause of vision loss and blindness in people over 65.

Also  known as wolf berries, goji berries are my new favorite ingredient to add to salads (a great addition to my Sweet Sesame Raw Kale Salad), smoothies, and stir-frys. Speaking of, I recently tried them in a Soba Noodle Stir-Fry featuring sirloin strips, shiitake mushrooms, green swiss chard and carrots. They provided a delicious tangy, sweet surprise to an otherwise straight foreword stir-fry.

IMG_3515

What You’ll Need:

  • 6 oz buckwheat soba noodles
  • 1 tbs grapeseed oil
  • 1 cup green onions (thinly sliced)
  • 6 oz sirloin steak (cut into thin strips – against the grain)
  • 2 cups shiitake mushroom caps (sliced)
  • 2 garlic cloves (minced)
  • 2 cups green swiss chard (washed)
  • 2 tbs rice vinegar
  • 1 tbs fresh lime juice
  • 3 tbs low sodium soy sauce
  • 1 tbs peeled fresh ginger (grated)
  • 1 tbs Frank’s Red Hot sauce (or Sriracha)
  • 1 tbs sesame oil (separate from first)
  • 1/4 tsp salt
  • 2 tsps toasted sesame seeds

IMG_3518

How to Make It:

  1. Cook noodles according to package directions (no need for salt or oil here). Drain and rinse under cold water.
  2. Combine rice vinegar, lime juice, soy sauce, fresh ginger, and Frank’s Red Hot in a small bowl, stirring with a whisk. Set aside.
  3. Heat grapeseed oil in a large skillet over high heat. Add onions and stir-fry 1 min. Add carrots and stir-fry another 2 min. Add mushrooms and garlic, stir-fry 1 minute. Add swiss chard and stir-fry 2-3 min until greens wilt.
  4. Move veggies to the periphery of the pan. Season your sirloin strips with a little salt and pepper then add them to the center of the skillet. Cook for 2 min (sliced thin, your sirloin will cook fast over high heat so be careful not to overdo it).
  5.  Add vinegar mixture to steak mixture, cooking and stirring constantly for 1 min. Stir in noodles, sesame oil, and salt; cook for 1-2 min until noodles are thoroughly heated. Sprinkle with sesame seeds and serve immediately.

My Top 5 Green Smoothie Recipes

It’s officially Cherry Blossom season here in the District, which means spring (real spring, not teaser spring) is just around the corner! To honor the onset of my favorite time of year in DC, I thought I’d share 5 of my favorite “Greenie”recipes. My Greenies are healthy vegan  smoothies that bring together fruit, dark leafy greens, plant-based protein and nutritional superfoods in one tasty and satisfying blend. At under 400 calories for 16oz of smoothie (that’s two full glasses!), all of these recipes are are great way to start your day. They’re also packed with dietary fiber (thanks to the flaxseed and chia seeds in there) and protein to keep you full and focused. Best of all, they have anywhere from 3 to 5 servings of fruits and veggies so by the end of breakfast you’ll have either met or surpassed your recommended daily intake. Now, that’s no excuse to eat junk for the rest of the day, but it is mighty nice to know that you’re giving your body much of what it needs for optimal function from the get-go. Also, studies show that if you start your day with a healthy breakfast you’re less likely to be obese, more likely to have good/stable blood glucose levels (and consequently more energy and less moodiness), and less likely to be hungry later in the day.

If you’re not a fan of almond milk substitute your favorite unsweetened rice, hemp, soy, coconut or skim milk, or try fat-free plain Greek, soy or coconut yogurt in lieu of almond milk yogurt. Coconut water is another good liquid to swap, just beware of its sugar content. Several brands really jack that up. My favorites are Blue Monkey, C2O, and–la crème de la crème–100% Raw Coconut Water.


(1) Banana-Berry Breakfast Greenie:

  • 8 oz unsweetened almond milk
  • 1 banana
  • 1 cup frozen whole strawberries
  • 2 handfuls baby spinach
  • 1 tbs almond butter
  • 2 tbs ground flaxseed
  • 1/2 tsp ground cinnamon

287 calories, 14g of dietary fiber, and 10g protein per serving.

(2) Blueberry-Kale Protein Greenie:

312 calories, 22g of dietary fiber, and 27g of protein per serving.

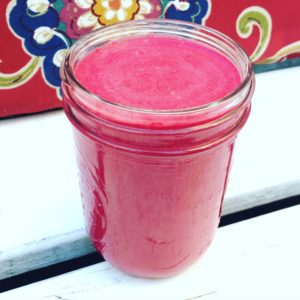
(3) Blueberry-Beet Power Greenie:

  • 8 oz unsweetened almond milk
  • 2 medium beets (boiled)
  • 1 cup frozen wild blueberries
  • 2 handfuls baby spinach
  • 1 tbs grated fresh ginger
  • 1 tbs fresh lemon juice
  • 3 tbs hemp protein powder
  • 2 tbs ground flaxseed

319 calories, 21g of dietary fiber, and 25g of protein per serving.

(4) Pineapple-Mango Vitamin-C Greenie:

  • 8 oz unsweetened almond milk
  • 1 cup frozen mango
  • 1 cup fresh or frozen pineapple
  • 2 handfuls of kale
  • 1 tbs chia seeds
  • 1/2 tsp ground cinnamon

341 calories, 13g of dietary fiber, and 10g of protein per serving.

(5) Dark Cherry Goji Greenie:

381 calories, 21g of dietary fiber, and 25g of protein per serving.

Food Allergy-Friendly Dinner Party

Times have changed and now it seems that almost everyone I know has a food allergy or sensitivity of sorts. Personally, I’m a card-carrying lactard. Despite my handicap, I’d still call myself a foodie – I just have to work harder on occasion! Due to my dietary shortcomings, all of the recipes on my blog are dairy-free, many are vegan, and from time-to-time they’re also gluten-free. The recipes below fall under all three categories and, as always, involve ingredients thoughtfully selected to boost your immune system and improve your overall health. Some of the nutritional rockstars in these recipes include:

Ginger: alleviates menstrual cramps; relieves an upset stomach; and has many other natural beauty and homeopathic applications

Coconut Milk: vitamins C, E and many of the metabolism-friendly Bs; magnesium, phosphorous, iron and potassium; may help combat heart disease and age-related diseases because of its high antioxidant content (for more info click here)

Garbanzo Bean Flour: see my post on Sweetly Salted Nut Butter Power Cookies

Turmeric: may prevent and slow the progression of Alzheimer’s disease, melanoma  and many other kinds of cancer; is a natural liver detoxifier (aka a hangover must); and may even play a role in fat metabolism. Need more convincing? Here’s a list of 20 benefits of this superspice.

THE MENU

Starter: Shaved Brussels Sprout Salad w/ Pine Nuts

Entrée: Red Lentil Coconut Soup with Shiitake Mushrooms and Spinach, served with Thyme-Infused Garbanzo Bean Flat Bread

Dessert: fresh seasonal fruit topped with shredded unsweetened coconut and dark chocolate bits

Wine Pairing: Vouvray or your favorite white wine

I wrote a blog on the first recipe earlier this week – click on the link above for details. As for the entrée, keep on reading.

**************

Red Lentil Coconut Soup with Shiitake Mushrooms and Spinach

 IMG_3333

What You’ll Need:

  • 2 cups red lentils, well washed
  • 1 tbs coconut oil
  • 1 onion, finely chopped
  • 4 garlic cloves, minced
  • 1 inch fresh ginger, grated
  • 2 tsp turmeric
  • 2 tsp cumin
  • 1 tsp sea salt
  • 1/2 tsp black pepper
  • 1/2 tsp cayenne pepper
  • 1 (28 ounce) can tomatoes w/ juice
  • 2 large carrots, peeled and chopped
  • 1 tbs fresh lemon juice
  • 6 cups vegetable broth
  • 1 (14 ounce) can light coconut milk
  • 2 cups shiitake mushrooms, thinly sliced
  • 1 shallot, minced
  • 1 tsp coconut oil
  • 1 bag spinach
  • 1/2 cup finely chopped green onions (to garnish)

How to Make It:

  1. In a large skillet, sauté onions in coconut oil until soft. Add garlic, turmeric, cumin, ginger, cayenne and salt and pepper. Cook, stirring for 1-2 min until aromatic. Add tomatoes with juice and bring to a boil, breaking up any large chunks as you stir.
  2. Add carrots, lentils, coconut milk and broth to your slow cooker. Spoon skillet mixture into slow cooker. Cover and cook on low for 6-8 hours. Stir in lemon juice and spinach leaves and continue cooking on high for last 20 min.
  3. Just after adding the spinach, in a medium skillet, sauté shallots in 1 tsp of coconut oil and a pinch of seas salt over medium heat for 3 min. Add shiitake mushrooms and cook for 2 min at medium heat then turn heat to low and cook another 8-10 min until tender and golden brown.
  4. Spoon soup into bowls and top with 1 tbs of thinly sliced green onions and 2 tbs of sautéed shiitake mushrooms.

Thyme-Infused Garbanzo Bean Flat Bread

IMG_3334

What You’ll Need:

  • 1 1/3 cups garbanzo bean flour
  • 1 1/2 tsp sea salt
  • 1 tbs dried thyme
  • 2 cups water
  • 2 tbs olive oil

How to Make It:

  1. In a large bowl, combine flour, salt and thyme. Slowly whisk in water. Let  mixture sit at room temperature for 30 min while oven pre-heats to 350 F.
  2. Place 9″ x 16″ cast iron griddle in oven while it heats. (You can also use a 10″ cast iron skillet here to make a more doughy version, akin to pizza crust).
  3. When batter is ready, whisk in 1 tbs of olive oil. Use the other 1 tbs to coat the griddle. Pour batter onto griddle and bake on center rack for 45 min to an hour (depending on the oven). The flatbread should be firm but chewy. Be careful not to burn. Carefully loosen flatbread from griddle with a spatula and let cool. Cut into strips and serve alongside your soup.

Finally, a great big thanks to my good friends and fellow yogis, Caroline and Jess, for being my test kitchen guinea pigs and great company!

IMG_3338

Shaved Brussels Sprout Salad w/ Pine Nuts

  IMG_3326

Shaved Brussels Sprout Salad w/ Pine Nuts 

  • 12-15 brussels sprouts, shredded (yield 6 cups)
  • ½ cup pine nuts
  • 1 tsp olive oil
  • pinch of sea salt

1. Using  mandoline, shred brussels sprouts 1/8″ thick–yield should be approximately 6 cups. Place shredded brussels sprouts in a large colander and wash thoroughly.

2. Pre-heat oven to  350° F. Toss pine nuts in olive oil and salt and spread on a small baking sheet. Bake in pre-heated oven for ~5 min, checking frequently to be sure they don’t burn.

3. In a large bowl, combine shredded brussels sprouts, toasted pine nuts and lemon vinaigrette (recipe below), massaging the ingredients to thoroughly coat. Cover and refrigerate for at least 1 hour before serving.

IMG_3317

Lemon Vinaigrette

  • 1/2 cup olive oil
  • 4 tbs fresh lemon juice
  • 1 tbs minced shallot
  • 1 tbs corse Dijon mustard
  • 1/2 tsp grated lemon peel
  • 1/2 tsp honey
  • 1 tsp fresh thyme
  • salt & pepper to taste

1.Combine all ingredients in a small glass bowl. Whisk vigorously to combine.

IMG_3325

Sweet Sesame Raw Kale Salad

If you’re reading my blog, chances are you know what kale is. Chances are even greater that you’re mildy obsessed with it. If this hasn’t happened yet, just you wait, pretty soon you’ll be buying the 2 lb big bag and putting this green goodness into anything you can think of–and for good reason!

Kale gets its emerald green hue from high levels of two disease-fighting carotenoids (lutein and zeaxanthin). These nutrients are part of the cellular makeup of your eye and help protect those peepers against harmful blue light and ultimately macular degeneration–the leading cause of eyesight loss in Americans over 60.

You like to see right? (Rhetorical question obviously.) Seriously though, go buy some kale and make this raw salad (or my kale chips) and do your part to protect that precious vision. Life is too beautiful not to see it through.

Sweet Sesame Raw Kale Salad

IMG_3058

What You’ll Need:

  • 2 tbs toasted sesame seeds
  • 2 tbs sesame seed oil
  • 2 tbs rice vinegar
  • 1 tbs light soy sauce
  • 2 tsp honey
  • 1 tbs fresh ginger, grated
  • 6 cups (or handfuls) curly kale, chopped

How to Make It:

  1. Mix all ingredients except kale in a mason jar (or any small container with a snug lid). Give the contents a good shake until combined.
  2. Put chopped kale (stems removed) in a large mixing bowl. Pour dressing on top and massage kale (yes, massage) for 1-2 min until thoroughly coated. (Manipulating the raw kale like this helps the dressing seep into the leaves, softening the kale and making it easier to digest.)
  3. Cover and let marinate in the fridge for at least an hour. I like to leave mine overnight.

BONUS TIP: this makes for a yummy dressing on just about any salad. Try it over cold soba noodles or shredded romaine with some raw cashews, blood orange segments, and lightly pan-fried tofu for a healthy vegetarian lunch.

Great Grains: Farro & Leek Risotto

In our slim-obsessed society we often lump carbohydrates into one demonized category to be avoided at all costs. Carbophobes, listen up!! Not only are whole grains an excellent source of vitamin E, they’re crucial to your metabolism because they’re rich in B-complex vitamins. They’re also packed full of dietary fiber–a.k.a. your best ally against over-eating and weight gain.

So how can you work these great grains into your diet? How about a delicious whole grain risotto recipe using farro and featuring another dietary supastar–leeks!

photo (2)

Leeks are a great source of Vitamin A. In fact, one serving contains up to 1/3 of your daily recommended value. As a member of the onion family they are a great source of allicin, which has proven anti-fungal and antibacterial properties–part of what gives these green tubers prebiotic properties. Prebiotics have been proven to alleviate symptoms of IBS and may reduce the risk of certain kinds of cancer.

photo (3)

What You’ll Need:

  • 6 cups low-sodium vegetable or chicken stock
  • 2 tablespoons extra virgin olive oil
  • 1 red onion, diced
  • 3 leeks, white and light green parts only, rinsed thoroughly and sliced into rings
  • 3-4 garlic cloves, minced
  • 1 cup Arborio rice
  • 1/2 cup dry white wine
  • 2 cups cooked farro (3/4 cup uncooked)
  • 1 cup fresh parsley, coarsely chopped
  • Salt & pepper to taste
  • 2 tbs fresh lemon juice

How to Make It:

  1. Bring stock to a simmer in a medium saucepan over low heat.
  2. Heat olive oil over medium heat in a large, heavy saucepan. Add diced onion and a pinch of salt, sautéing for 3-4 min. Then add leeks and sauté another 2-3 min. Once onions and leeks begin to soften, add garlic and Arborio rice. Cook about 3 min, or until rice begins to crackle.
  3. Pour in wine and cook over medium heat, stirring constantly, until the wine has almost completely disappeared. Stir in one ladleful of simmering stock. The stock should bubble not boil. Cook, stirring often, until it’s almost absorbed. Add another ladleful and continue cooking like this (adding more liquid when the rice is almost dry) until you’ve used up most of your stock and the rice is al dente.
  4. Stir in the pre-cooked farro (make it according to the directions on the package), parsley  fresh lemon juice, and salt and pepper to taste. and herbs. Add another ladleful of stock and continue to cook for a minute, then a remove from the heat.
  5. The risotto should be creamy but not runny. If it’s dry, add a little stock.

Making this will be a labor of love. You’re constantly ladling and stirring, so grab a glass of wine and don’t drift too far from the stove. It’ll be worth it, I promise!

Eggplant and Bulgur Lasagna w/ Nutritional Yeast “Gratin”

A couple months ago, I devised a moderate cleanse meant to reset your eating habits and remind you how good you can feel when you eat clean, simple, real food. At the time one of my readers asked how they could incorporate nutritional yeast into the program. Say what? That was the first I’d heard of such a thing but I’m so grateful she brought it to my attention. Nutritional yeast is a complete protein and an excellent source of  B-complex vitamins, including B-12. It’s naturally low-fat and low-sodium. Best of all, this “Hippie Dust” gives recipes a creamy, nutty and cheesy flavor without sugar, dairy, or gluten. Vegans and the gluten-intolerant rejoice! So if you don’t know, now ya know.

photo

Knowing how good this stuff is for you, I wanted to come up with a recipe that would be so good it would convince you that something with a name like ‘nutritional yeast’ is actually delicious. Thus, Eggplant and Bulgur Lasagna w/ Nutritional Yeast “Gratin” was born. Okay, so it’s not really lasagna, nor is it topped with a true gratin, but it is a layered, warm, hearty meal with a tasty cheesy topping. Onto the recipe!

For starters, my HOMEMADE TOMATO SAUCE (which can be used in many things):

IMG_2930

What You’ll Need:

  • 1 tbs extra virgin olive oil
  • 1 medium onion, chopped
  • 4 garlic cloves, minced
  • 1/2 cup dry white wine
  • 4 large fresh tomatoes, diced (skin on)
  • 1 tbs tomato paste
  • Salt and freshly ground pepper
  • 1/2 tsp cane sugar (optional)*
  • 1/4 tsp cinnamon
  • 1/2 tsp paprika
  • 1/4 tsp allspice
  • 1/4 cup flat leaf parsley, finely chopped

How to Make It:

  1.  Heat olive oil in a large saucepan over medium heat. Add your chopped onion (with a pinch of salt) and sauté until tender. Add the garlic and sauté another few minutes until fragrant. Pour in your dry white wine (it should bubble and hiss) and deglaze the bottom of the pan. 
  2. Add tomatoes, tomato paste, sugar and spices. Bring to a boil, then reduce to simmer for 10-15 min. At the end add your parsley and turn off the heat. (You could also add fresh basil and/or oregano here if you’re a fan).

Now that you have that step out of the way, here’s what you’ll need for the rest of the “lasagna” fixings…

ROASTED EGGPLANT:

IMG_2932

What You’ll Need:

  • 1 large eggplant
  • 2 tsp salt
  • 1 tbs olive oil

How to Make It:

  1. Preheat your oven to 450°F.
  2. Cut your eggplant lengthwise into six 1/4″ slices.
  3. Generously salt both sides of each piece and set aside for 10-15 min. This will help remove excess moisture and any bitterness.
  4. Rinse eggplant and pat dry.
  5. Using a nonstick baking sheet, distribute your eggplant in a single layer. Lightly salt and oil the pieces on both sides.
  6. Bake for 1o min, remove and set aside.

MAKING BULGUR:

IMG_2934

What You’ll Need:

  • 1 cup bulgur
  • 2 cups water

How to Make It:

  1. Bring 1 cup of bulgur and 2 cups of water to a boil, then reduce to a simmer and cook for 10-15 min.
  2. Remove from heat and set aside.

ASSEMBLING THE WHOLE SHEBANG

IMG_2936

In a large (9″ x 13″) baking dish, start with a thin layer of tomato sauce. Then add half of your cooked bulgur. Top the bulgur with three slices of roasted eggplant.

IMG_2938

Repeat, ending with whatever is left of your tomato sauce.

Finish with la pièce de résistance, the “Gratin” topping:

IMG_2940

What You’ll Need:

  • 1/2 cup Nutritional Yeast
  • 1/2 cup whole wheat breadcrumbs
  • Salt and pepper, to taste
  • 1/2 tsp paprika

How to Make It:

  1. Mix nutritional yeast and breadcrumbs in a bowl with salt and pepper to taste. 
  2. Sprinkle evenly over the top of your lasagna.
  3. Dust the “gratin” with paprika for a bright finishing touch.
  4. Cover the pan with tin foil and place in your oven (pre-heated to 350°F this time) for 30 min. Uncover and cook an additional 10 min. Let cool for at least 10 min before serving.

Top each serving with 2 tbs of fresh, chopped parsley for an added hit of flavor. This will keep in your fridge for up to a week and can also be frozen for up to a month. Enjoy!

*One of my brilliant fellow yogis who shares my passion for finding healthy alternatives to traditional meals suggested the following: “instead of cane sugar just add a whole carrot then remove it when you are done. It add sweetness to the sauce and cuts the acidity of the tomatoes just like sugar.”