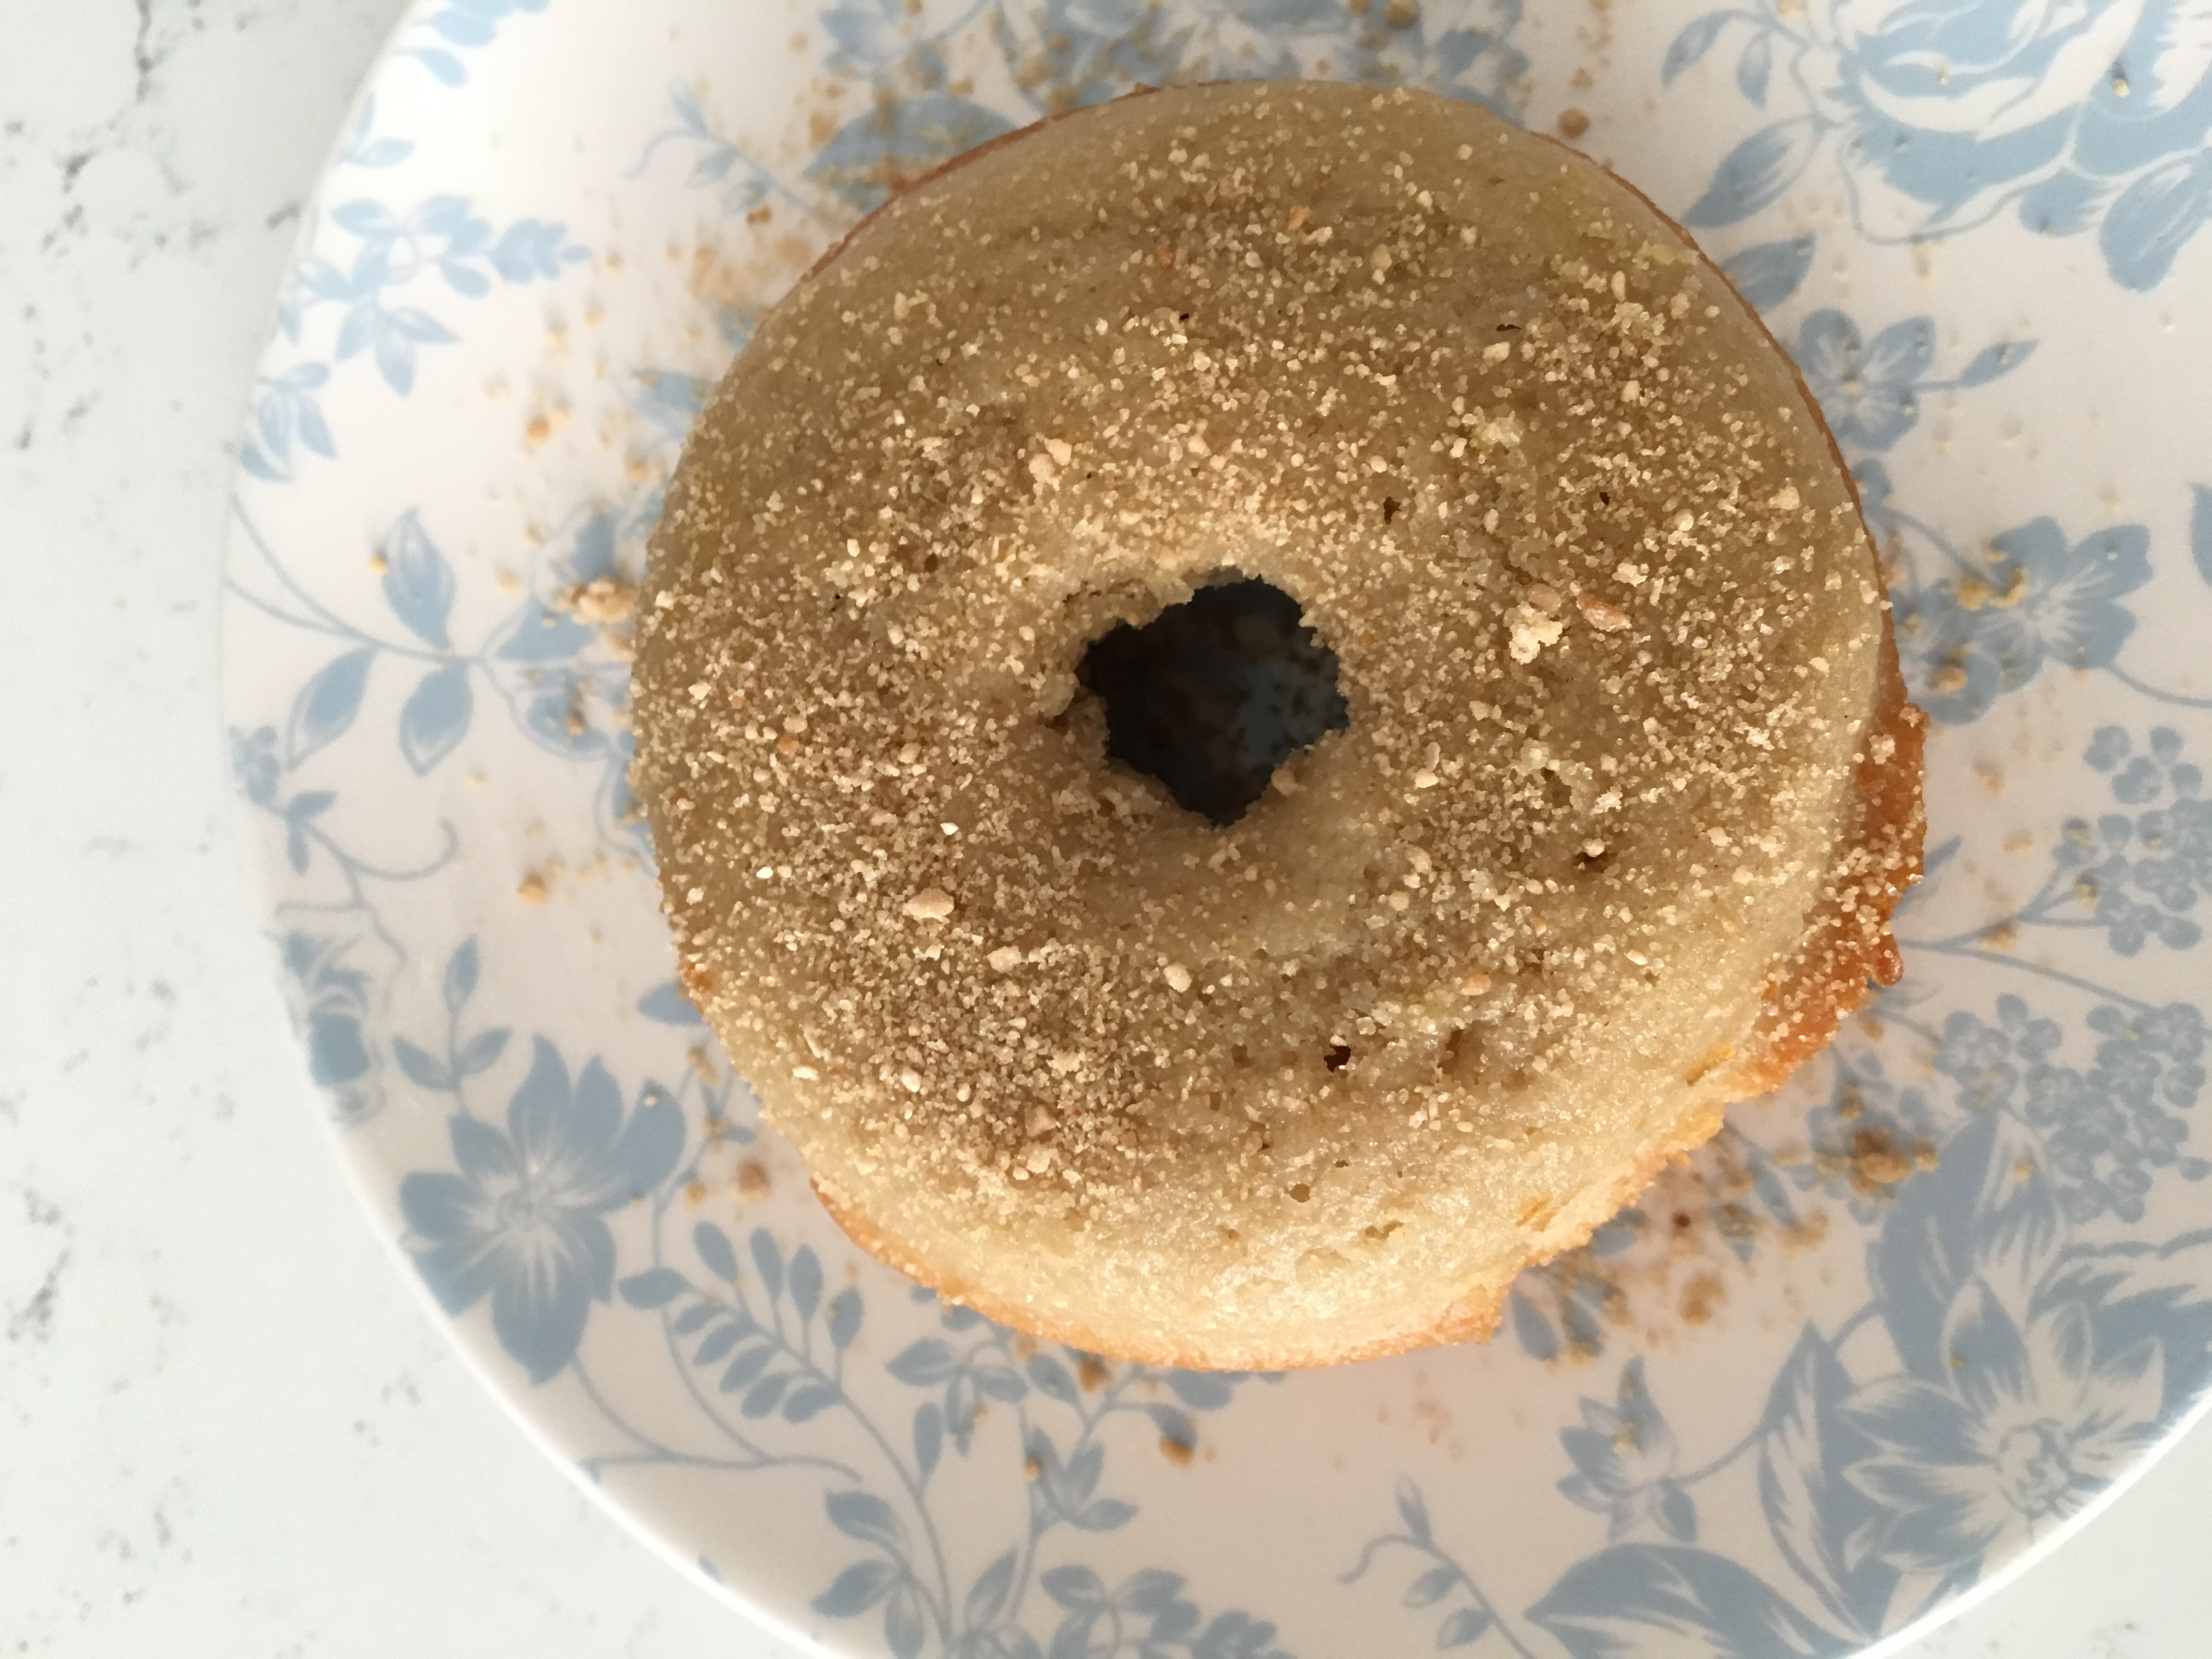
Maple-Apple Cake Donuts

Sure, pumpkin anything is bringing sexy back this fall (and all the falls) but apples have been an autumnal all-star far longer. We could do a comparison table here showcasing everything you can do with apples versus pumpkin and I bet these two tasty ingredients would be neck-and-neck, but that is too much formatting and work for me to handle before my next yoga class (truth be told). So instead, I’m going to tell you about how I turned this delicious Pumpkin Cake Donut recipe from King Arthur Flour into a Maple-Apple Cake Donut using apples I picked from my local Waters Orchard.

Growing up in Massachusetts, my favorite donuts were those powdered cake donuts from Dunkin’ Donuts which inevitably left more sugary dust on your chin and clothes than made it into your mouth. I loved the fluffy texture and sweet remnants you got to lick off your lips after the treat was done. As a nutrition coach, I tend not to eat or recommend too many donuts these days but if you’re going to do it, do it good.

The following Maple-Apple Cake Donut recipe was inspired by sweet apples and a small jar of granulated maple sugar from my parents up in New England. The ingredients did the talking, King Arthur helped me with the baseline, and my creative mind made swaps to cut back on added sugar and fuse these fluffy Os with fall flavor.
Maple-Apple Cake Donuts

MAPLE-APPLE CAKE DONUTS

Makes 12 donuts

Ingredients:

  • 1/4 cup coconut oil, melted
  • 1/2 stick of butter (or 1/4 cup), melted
  • 3 large eggs
  • 1/2 cup cane sugar
  • 1/4 cup light brown sugar
  • 2 Tbs maple syrup
  • 1 1/2 cups 15-minutes homemade apple sauce (recipe follows)
  • 1 tsp ground cinnamon
  • 1/4 ts ground nutmeg
  • 1/8 tsp ground cloves
  • 1 1/2 tsp fine sea salt
  • 1 1/2 tsp baking powder
  • 2 cups all-purpose flour, level
  • Granulated maple sugar for dusting


Directions:

  1. Preheat the oven to 350°F. Lightly grease two donut pans
  2. In a large mixer, use the flat beater attachment to combine the oil, butter, eggs, sugars, maple syrup, apple sauce, spices, salt, and baking powder until smooth. (You can also do this by hand with a little elbow grease and a whisk). 
  3. Add the flour, stirring just until smooth.
  4. Fill the wells of the donut pans about  to the top but be careful they don’t overflow.
  5. Bake for ~18 minutes, or until a toothpick inserted into the center of one comes out clean. 
  6. Remove from the oven, let cool a few minutes, loosen the edges (if need be) with a butter knife, and gently flip onto a rack to cool. 
  7. While the doughnuts are still warm generously dust them with granulated maple sugar (or cinnamon sugar).
  8. Let cool completely and store at room temperature for several days. I like to place them on a plate, stick them with toothpicks, and tent them with plastic wrap so they have room to breath.


HOMEMADE APPLE SAUCE

Ingredients:

  • 2 extra large or 3 large apples – peeled, cored and chopped
  • 1 tsp brown sugar
  • 1/2 tsp ground cinnamon


Directions:

  1. In a medium microwavable mixing bowl, combine prepped apples with sugar and cinnamon.
  2. Microwave for 3 minutes, stir, and microwave again another 3-4 minutes until apples are soft (not mushy) when pricked with a fork.
  3. Transfer to a blender or food processor and blender until mostly smooth (any little chunks will taste delicious when you bite into them).


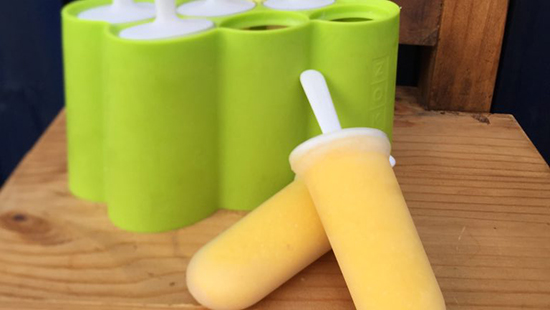
Spicy Mango-Coconut Popsicles

We live in a world addicted to sugar, it’s true, but going cold turkey doesn’t always work out so well. Deprivation can lead to yo-yo eating patterns, which won’t help you sustain your long-term healthy eating goals. A better approach that I often help my wellness clients take is making healthier versions of your favorite meals.

Dessert, while not the most essential of meals, is nonetheless an important food ritual many of us enjoy – and hey, life is best when enjoyed! One of my favorite challenges is finding ways to make sweets better for you without tasting like sawdust or bland ice.

IMG_6433 2

With that in mind, I recently experimented with  a Mango Coconut Popsicle recipe, spiced with ginger. Ginger is a superfood linked to relieving nausea, inflammation, pain and a whole host of digestive issues. I also threw some turmeric in there because, well, why not? It too has anti-inflammatory properties and might help your skin and joints look and feel their best.

This fast and tasty recipe is guilt-free and impossible to mess up. Bonus: any leftovers that won’t fit in your molds can be enjoyed on the spot as a healthy smoothie. Enjoy!

IMG_6431 2


Spicy Mango-Coconut Popsicles

Servings: 6-8 popsicles


Ingredients:

  • 1 1/2 cups frozen mango
  • 1/2 very ripe banana
  • 1” fresh ginger, peeled
  • 1/2” fresh turmeric, scrubbed
  • 1/2 cup whole fat plain yogurt
  • 1/3 cup toasted coconut flakes
  • 8 oz unsweetened almond milk


Directions:

  1. Blend ingredients in a high-speed blender for 1 minute or until smooth.
  2. Pour into popsicle molds leaving about a 1/4” at the top. Any leftovers can be consumed like a smoothie – yum!
  3. Freeze for at least 3 hours, but ideally overnight.

Strawberry Rhubarb Pie (Gluten-Free)

This summer, why not wow dinner and BBQ guests with a healthier than average dessert featuring fresh, seasonal ingredients? Strawberry Rhubarb Pie is a summer classic, perfect for any party.


I bet you can’t guess my favorite aspect of this sweet treat: it’s loaded with a nutrient-dense vegetable! Okay, so maybe you could have guessed I would like that part.

IMG_0987

Rhubarb is a surprising source of calcium–just one cup has 10% of your RDA–and beauty-boosting nutrients like lutein, vitamin K, and antioxidants. Who doesn’t need a little extra help with healthy skin in the summer? All that heat, humidity, and sunshine can do a number on our most exposed organ.

Ok, first, please drool over this picture then scroll down for the recipe…

IMG_0991

Strawberry Rhubarb Pie

Ingredients

  • Gluten-Free Pie Crust
  • 1 pint strawberries
  • 4-5 stalks rhubarb
  • 1/2 cup raw cane sugar
  • 1/4 cup arrowroot powder
  • Splash of sweet vinegar (white balsamic or fruit-flavored of choice)
  • 1/2 tsp sea salt

Directions:

  1. Prepare one Gluten-Free Pie Crust (or cheat a little and get one pre-made).
  2. Pre-heat oven to 425 F.
  3. Wash and cut strawberries and rhubarb into bite-sized pieces. Place in a large bowl and mix with sugar, arrowroot (or cornstarch if you aren’t gluten-free), vinegar, and salt. Mix thoroughly and let sit for 15 minutes.
  4. Press pie crust into your favorite nonstick tart or pie dish. Fill crust with fruit and vegetable mixture, spreading evenly.
  5. Bake at 425 F for 30 min then reduce to 350 F and bake another 20-25 minutes or until crust edges are golden brown.

Top with a scoop of your favorite ice cream. I went with Moorenko‘s creamy, delicious Vanilla Bean variety. YUM-E.

Blood Orange and Ginger Sorbet

Much as I’ve loved this late and lurid winter we’re having in DC, I’m off to warmer weather. In an attempt to transport you to the places where people wear shorts and sip margaritas beachside this time of year, I thought I’d share with you a recipe for a refreshing sorbet. Personally, I’d eat this regardless of freezing temperatures so long as there’s a bathrobe and space heater nearby, am I right?!

While you might not be ready for this chilly concoction just yet, you should definitely bookmark the recipe or print it because blood oranges and ginger are two superfoods you don’t want to miss out on. Blood oranges are high in vitamin C, potassium, dietary fiber, carotenoids, and polyphenols like your standard oranges, and also have the added benefit of anthocyanins–powerful antioxidants which fight disease and inflammation. Ginger, one of my all-time favorite superfoods, is widely used to treat nausea, flatulence,stomach upset, and morning sickness. Ginger has also been linked to relieving the symptoms of upper respiratory tract infections, bronchitis, coughs, menstrual cramps, arthritis, and muscle pain. This super-root is as close to a homeopathic panacea as I’ve seen.

MOARfit by Amy RIzzotto | Blood Orange and Ginger Sorbet

Blood Orange and Ginger Sorbet

Ingredients:

  • 4 pounds blood oranges or other oranges
  • 1 1/4 cups water
  • 3/4 cup sugar
  • 1 ½ Tbs orange zest
  • 1 Tbs grated ginger
  • Juice of one Meyer lemon

Directions:

  1. Finely grate the zest of two oranges, 1 lemon, and about 1½” of peeled, fresh ginger root.
  2. Combine 1 1/4 cups water, sugar, zest and ginger in heavy medium saucepan. Stir over high heat until sugar dissolves and syrup boils; remove syrup from heat to cool.
  3. Peel oranges and remove all pith, strings, and seeds. Transfer oranges and lemon juice to a blender or food processor; puree until smooth, about 30 seconds. Measure 4 cups orange puree and mix into orange-lemon-ginger syrup (reserve any remaining puree for another use—hello bold an beautiful smoothies!).
  4. Cover orange mixture and refrigerate for at least 6 hours and up to 1 day to blend flavors.
  5. Process orange mixture in ice cream maker according to manufacturer’s instructions. Transfer to a container, cover, and freeze.
  6. Eat within a week for best results.

Gluten Free Strawberry Balsamic Tart with Mint

Two weeks ago, I shared a recipe for Gluten Free Pie Crust. On this Meatless Monday, it’s time to fill it!

With all the yummy fresh strawberries I’ve been receiving in my weekly From the Farmer basket, I couldn’t resist making a Strawberry Balsamic Tart. This sweet and savory treat is perfect for a summer night and easy to transport to a friend’s BBQ as long as you leave it in the pan. It’s on the healthier side of dessert so feel free to indulge guilt-free or perhaps break the rules and have it for breakfast!

Gluten Free Strawberry Balsamic Tart


What You’ll Need:

  • 1 recipe of Gluten Free Pie Crust
  • 1/2 cup + 2 Tbs balsamic vinegar
  • 2 tsp raw (or lavender-infused…) honey
  • 1 pint fresh strawberries (washed, hulled and sliced) – or about 2 cups sliced
  • 5-10 mint leaves
How to Make It:
  1. Pre-heat oven to 400 F.
  2. Add balsamic to a saucepan and cook over medium heat until reduced by about half. Let cool and it should form into a nice syrup or “reduction.”
  3. Melt honey and add to the balsamic reduction. Stir to combine.
  4. Roll pie crust thin between two sheets of parchment paper. This doesn’t have to be perfect as you’ll press it into your pie dish or tart pan. Make sure you get all the way up to the edges and rim of the pan and spread the dough around evenly.
  5. In a large bowl, mix cut strawberries and balsamic/honey mix. Spread mixture evenly inside crust.
  6. Bake for 25-30 min or until the crust edges turn a nice golden brown. Remove and let cool 10-30 min. 
  7. Cut up mint leaves and sprinkle on top. Serve on its own or with a rounded scoop of vanilla ice cream or coconut sorbet.
Don’t forget, my readers receive 20% off their first 4 From the Farmer baskets with code ‘MOARfit’ at checkout!

Raspberry Rose Water Popsicles

Many moons ago, I was having afternoon tea in Paris with one of my dearest friends. This particular cafe was known for its incredible desserts so who was I to turn down a golden opportunity for indulgence? The treat I selected was an oversized raspberry macaroon filled with rose water cream and adorned with fresh ripe raspberries. It has lingered on my palette in some small way ever since, bubbling up into my memory from time to time and bringing a smile to my face and hankering to my stomach.

IMG_4631

Years later I am finally honoring that moment of gastronomic bliss with a healthier nod to my all-time favorite. My Raspberry Rose Water Popsicles are packed with antioxidant-rich raspberries and are gluten and dairy-free. Summer is winding down so enjoy these chilled delicacies before fall settles in!

What You’ll Need:

  • 2 tbs rosewater
  • 6 oz plain unsweetened coconut yogurt
  • 4 oz coconut milk
  • 1 heaping cup frozen rasberrries
  • 1 really ripe banana

How to Make Them:

Blend all ingredients together and pour into popsicle molds. Leave in your freezer overnight and enjoy!

Sweetly Salted Nut Butter Power Cookies

After drooling over a photo of grain-free peanut butter chocolate chip cookies posted by my friend Jehan on Instagram, I decided to put my own twist on a healthy, garbanzo bean-based power cookie. If you’re gluten-free, garbanzo bean flour is just about the best “alternative” flour out there. Unlike other bean flours and substitutes like almond meal, it doesn’t need to be combined with regular flour.

Not convinced? Check out this nutritional tête à tête:

Garbanzo Bean Flour:

  • 1/4 cup contains 110 calories
  • 6g protein
  • 18g of carbohydrate (of which 5g is dietary fiber)
  • 10% of the daily value for iron

Whole Wheat Flour:

  • 1/4 cup contains 110 calories
  • 4g of protein
  • 23g of carbohydrate (of which 4g is dietary fiber)
  • 6% of the daily value for iron

Brown Rice Flour:

  • 1/4 cup contains 140 calories
  • 3g of protein
  • 31g of carbohydrate (of which only 1g is dietary fiber)
  • 4% of the daily value for iron

Let’s all clap for the heavyweight champ: Garbanzo Bean Flour!

These power cookies are full of protein, dietary fiber, vitamin E, iron and a delicious kick of sea salt, dark chocolate and your favorite natural nut butter.  If you’re constantly on-the-go, this is the perfect snack to tuck in your purse, backpack or hipster messenger bag for a healthy pre- or post-workout way to (re)fuel your body.

Chocolate Nut Butter Power Cookies

IMG_3052

What You’ll Need:

  • 3/4 cup natural almond or peanut butter (raw, unsalted)
  • 1/3 cup raw honey (+2 tbs hot water)
  • 1/3 cup unsweetened apple sauce
  • 1 egg
  • 2 tsp vanilla extract
  • 1 1/2 cups garbanzo bean flour
  • 1/2 tsp baking soda
  • 3/4 tsp  baking powder
  • 1/4 tsp table salt
  • 1 cup dark chocolate chips
  • 1/2 tsp coarse sea salt (to spring on top)

How to Make Them:

  1. Preheat oven to 350°F. Combine all dry ingredients in a large bowl and set aside.
  2. In a KitchenAid mixer or food processor, mix your nut butter, raw honey and water until smooth. Add in apple sauce, egg and vanilla extract and blend again.
  3. Slowly fold in the dry mix, blending as you go.
  4. Mix in the chocolate chips with a baking spatula. (Don’t be alarmed if it doesn’t look like the typical cookie mix. It is meant to be very thick and sticky.)
  5. With wet hands, form into 1″ balls. Place balls 1″ apart on a piece of parchment paper. Gently press down on each with a fork, criss-crossing imprints if you want to be fancy.
  6. Sprinkle each cookie with a few grains of coarse sea salt (if you’re into the whole salted-sweets crazy like I am:). Bake for ~10 min.

If you try this recipe out, let me know what you think. The dough can be hard to work with but these tasty power cookies are worth it!

Healthy Obsession: Chia Pudding

Unless you’ve been living under a rock, or perhaps rural Kentucky, you’ve heard the buzz around chia seeds. Yes, these are the same chia seeds popularized in the ’80s by Chia Pets (“watch them grow!”), now apparently the latest tool of Obama’s electoral campaign…but I digress.

These ancient Aztec nuggets have been given a new lease on life and a substantial share of the health food industry due to their impressive nutritional checklist: Iron, Magnesium, Calcium, protein, dietary fiber, antioxidants and the highest concentration of skin-perfecting Omega-3s found in any whole food. Like all A-list health foods these days, chia seeds are raw, gluten-free, kosher, and vegan. Tree-huggers worldwide, rejoice!

I am always skeptical of ‘superfoods’ that make lofty promises–e.g. açaí berries–but after trying these out in a number of recipes from homemade energy bars and smoothies to oatmeal and most recently PUDDING, I’m a believer. Plus, bonus (!!), anything with a few tablespoons of chia seeds in them make you feel full and satisfied. One reason for this is their fiber content (5g per tablespoon). The other reason is these little guys plump up in liquids, acting as a thickener and replacing the need for gelatin in the following recipe.

So, back to PUDDING. I recently made a really yummy batch of chia seed pudding and had to share. Life is about moderation and every now and again I’m sure as hell going to splurge on a red velvet cupcake or chocolate lava cake, but, come on now, who doesn’t love a guilt-free dessert? This recipe is so simple, so tasty and super healthy to boot.

Spiced Chocolate Chia Seed Pudding

  • 2 cups of unsweetened vanilla coconut-almond milk
  • 1/2 cup of chia seeds
  • 1/3 cup of agave syrup
  • 1/4 cup unsweetened cocoa powder
  • 1 tsp cinnamon
  • 1/4 tsp chile powder (if you like more kick like me, double)

Mix all the dry ingredients together in a tupperware then pour the wet ingredients on top, whisking vigorously. Cover and place in the refrigerator. Et voilà, 6-8 hours later your dessert is ready! The consistency is a little funky–think some combination of bubble tea tapioca balls and passion fruit seeds–but don’t knock it ’til you try it. Now go and enjoy your delicious, chocolate-y creation knowing it’s nutritious and delicious.

[slideshow]

I’ve also made a vanilla version of this recipe, which I may or may not have eaten for breakfast this morning. Shh, don’t tell! Just remove the cocoa and chile powder and replace those flavors with the pulp of one vanilla bean.