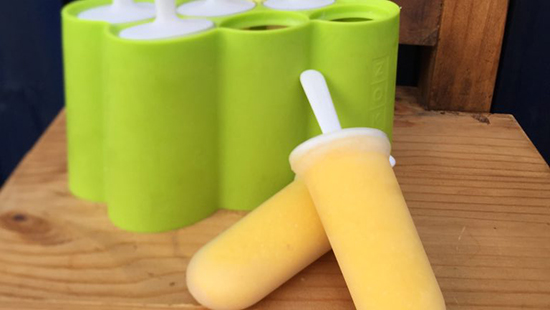
Spicy Mango-Coconut Popsicles

We live in a world addicted to sugar, it’s true, but going cold turkey doesn’t always work out so well. Deprivation can lead to yo-yo eating patterns, which won’t help you sustain your long-term healthy eating goals. A better approach that I often help my wellness clients take is making healthier versions of your favorite meals.

Dessert, while not the most essential of meals, is nonetheless an important food ritual many of us enjoy – and hey, life is best when enjoyed! One of my favorite challenges is finding ways to make sweets better for you without tasting like sawdust or bland ice.

IMG_6433 2

With that in mind, I recently experimented with  a Mango Coconut Popsicle recipe, spiced with ginger. Ginger is a superfood linked to relieving nausea, inflammation, pain and a whole host of digestive issues. I also threw some turmeric in there because, well, why not? It too has anti-inflammatory properties and might help your skin and joints look and feel their best.

This fast and tasty recipe is guilt-free and impossible to mess up. Bonus: any leftovers that won’t fit in your molds can be enjoyed on the spot as a healthy smoothie. Enjoy!

IMG_6431 2


Spicy Mango-Coconut Popsicles

Servings: 6-8 popsicles


Ingredients:

  • 1 1/2 cups frozen mango
  • 1/2 very ripe banana
  • 1” fresh ginger, peeled
  • 1/2” fresh turmeric, scrubbed
  • 1/2 cup whole fat plain yogurt
  • 1/3 cup toasted coconut flakes
  • 8 oz unsweetened almond milk


Directions:

  1. Blend ingredients in a high-speed blender for 1 minute or until smooth.
  2. Pour into popsicle molds leaving about a 1/4” at the top. Any leftovers can be consumed like a smoothie – yum!
  3. Freeze for at least 3 hours, but ideally overnight.

Carrot Coconut Ginger Holiday Detox Salad

Let’s face it, after the holidays we could all use a little dietary detox. The problem is a lot of us are cooked out from dinner parties, social outings, and family gatherings galore. They’re all in good fun, but when the season has passed we’re typically ready for some reprieve.

This salad is super easy and uses inexpensive ingredients (need I mention the holidays leave our wallets exhausted too?). Better yet, it’s full of dietary fiber and super-spice ginger to help get your digestion back on track. Belly bloat, goodbye!

Coconut Carrot Ginger Salad_MOARfit by Amy Rizzotto

Poach or bake a 3-4oz serving of salmon (about the size of a deck of cards) to serve alongside it and you’ve got a healthy, post-holiday detox meal using delicious whole foods that will heal your gut and guilt from the inside out!

Coconut Carrot Ginger Salad_MOARfit by Amy Rizzotto

Carrot Coconut Ginger Holiday Detox Salad

{makes 4 servings}

What You’ll Need

For the dressing:

  • 2 Tbs minced fresh mint
  • 2 Tbs olive oil
  • 1 Tbs fresh lime juice
  • 1 Tbs unsweetened coconut milk
  • 1 Tbs honey
  • 1” grated fresh ginger
  • ¼ tsp sea salt

For the salad:

  • 3 cups grated carrot
  • 1 cup raisins
  • ½ cup coconut flakes
  • ½ cup toasted slivered almonds

Directions:

  1. In a large mixing bowl, whisk together the dressing ingredients.
  2. Add the salad ingredients and toss together until evenly coated.
  3. Refrigerate for several hours before serving.
  4. Serve cold or at room temperature.

This is just the tip of the iceberg.

If you want more detox recipes and are in need of a total system reset, sign up for my self-guided remote 10-day detox. My detoxes help you reset your relationship with food, understand where cravings come from, and leave you feeling energized and uplifted! With sign-up you’ll get:

  • Welcome Guide with all the information you need to detox effectively and safely
  • Meal Plan and Recipe Book featuring seasonal ingredients
  • Tips for transitioning out of the detox successfully
  • Access to a Pinterest board filled with delicious detox-friendly recipes for extra inspiration
  • A discount on private post-detox nutrition coaching

You can find this and other items in my online store.

Cherry Cashew Power Bites


If you’re like me and you’re always on the go, it can get hard to eat three healthy meals a day let alone snacks. Healthy eating takes planning. To help you incorporate more whole foods into your busy lifestyle  I’ve come up with an easy snack recipe that you can make on the weekend, store in the fridge and enjoy for the next 10 days.

IMG_3626

These Cherry Cashew Power Bites are perfect for pre-workout fuel because they’re a balanced combination of fat/protein/carbs that will keep you energized but not overly full (which can detract from the task at hand). Every ingredient is a whole food that your grandma would recognize. Best of all, there’s no added sugar so you don’t run the risk of a glycemic spike and resulting crash.

If you’re not a fan of dried cherries, opt for dried mango or wild blueberries–just make sure they are unsweetened and unsulphured.

*************************

CHERRY CASHEW POWER BITES

 What You’ll Need:

  • 2/3 cup raw cashews
  • 1 cup  dried dark cherries (unsweetened)
  • ½ cup unsweetened shredded coconut, plus more for garnish
  • seeds of 1 vanilla bean
  • 1/2 tbs lime zest
  • 1/4 tsp sea salt
  • 1/4 tsp turmeric (optional)
  • 1/4 tsp chili powder (optional)

How to Make Them:

1. Soak cashews for 3-4 hours. Drain and rinse.
2. Soak cherries for 20-30 minutes until slightly softened and plump.

IMG_3624
3. Combine all ingredients in a food processor and pulse until a sticky dough is formed.

IMG_3625
4. Use a teaspoon to spoon out enough to make a 1″ ball. Squeeze the dough in your palm to bring it together and roll between your palms until you get a nice ball.
5. Roll in shredded coconut to coat.

Recipe makes approximately 20 power bites. Store in the fridge for up to 2 weeks.

At approximately 110 calories per ball. I like to snack on one or two of these 30 minutes to an hour before I workout. They give me the energy my body needs to move and play but don’t weigh me down.

Don’t ya like Bran Muffins?

I love muffins. We all do. On the contrary, not many of us love bran muffins, but we should. Here’s why: bran–the outer layer of grains like oats, wheat and rice–is made of insoluble dietary fiber. Bran is good for your GI tract, is a pro-biotic food (meaning it has natural antibacterial fighting properties), and helps in combating heart disease. I feel fairly confident that I’ve found a way to make bran muffins mo’ than nutritious, and dare I say delicious. Not only that, but I’ve made them low-fat by substituting a ripe banana for oil, nutrient-rich by using whole wheat flour and almond meal in lieu of refined white flour, and dairy-free by trading out buttermilk/yogurt for almond milk. Eating is believing, so enjoy!

AMY’S BANANA BRAN MUFFINS:

Ingredients:

  • 2 cups wheat bran
  • 1 1/2 cups currants
  • 1 cup water
  • 1 cup unsweetened chocolate or vanilla almond milk
  • 1 tbs orange zest
  • 1/2 cup Demerara sugar (or pure cane sugar)
  • 1 (very ripe) banana
  • 2 large eggs
  • 1/2 cup whole wheat flour
  • 1/4 cup almond meal
  • 1 teaspoon baking powder
  • 1 teaspoon baking soda
  • 1/2 teaspoon salt
  • 1/2 cup shredded (unsweetened) coconut – optional

Instructions:

  1. Preheat the oven to 350°F. Line a 12-cup muffin pan with paper liners or grease lightly with oil (I use the spray kind).
  2. Spread the wheat bran on a baking sheet and toast in the oven for 6-8 minutes, being careful not to let it burn!
  3. Let the bran do it’s thing while simultaneously heating the currants with 3/4 cup of the water for 10 minutes, or until the water is mostly absorbed. Puree the raisins with the remaining 1/4 cup of water in a food processor or blender until semi-smooth (I like to keep some whole or semi-whole currants in there for texture).
  4. Mix together the toasted bran and almond milk. Add in the currant puree, orange zest and Demerara sugar. Stir in the mushy banana and two eggs.
  5. In a separate bowl, mix together the flour, almond meal, baking powder, baking soda and salt. Fold into the wet ingredients and stir until everything comes together. Mix in the coconut (you could also add walnuts, pecans, or even chocolate chips here!)
  6. Spoon the batter into the muffin pan, mounding the batter in each one.
  7. Bake for 25 to 30 minutes, or until the muffins feel firm in the center.
  8. Let cool for 10-15 minutes then remove from the pan.

Enjoy immediately or freeze for up to 3 months. They are grrrreat for breakfast with a cup of coffee or tea and some fresh fruit. Bon appetit!

P.S. Just in case you didn’t quite catch the reference insinuated by the title: http://muffinfilms.com/psst.html. Psst!