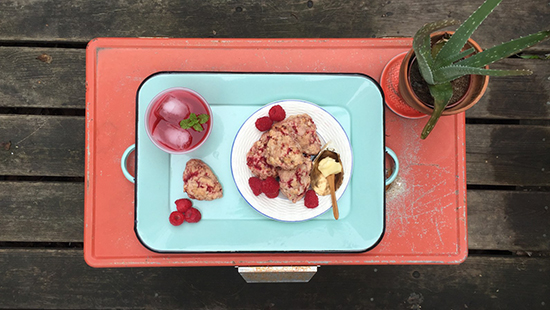
Rosewater Raspberry Gluten-Free Scones

I highly recommend taking a long weekend with friends, yummy food, and outdoor walks in the sunshine; and without a computer or to do list. Like highly recommend it. I recently did just this up in NYC with some of my dearest girl friends with whom (is that proper grammar??) I studied abroad nearly 10 years ago. Damn, the years are flying by! Anyways…


We had a ball! Despite bopping around a bunch like an itinerant little gypsy, the weekend wasn’t stressful at all. Leaving my computer at home certainly helped, but mostly it was my lack of an agenda – something I struggle to let go of in my daily DC grind – that created space and time to do everything I needed and wanted with flexibility and a sense of ease.


Here are some highlights…


On Saturday, I went to the Union Square Famers Market (amazing) and gawked at peonies the size of my face and farm-fresh eggs that looked like the most beautiful golden nuggets I’ve ever seen. I would have stayed there the whole day if it weren’t for the sweltering heat and sweaty mess I had quickly become.


IMG_5245

IMG_5242


Sunday, was a day filled with jamm, which means “peace” in Wolof, Senegal’s native tongue. The girls and I throw that word around a lot when we’re together since Dakar was our study abroad destination and jamm was our main objective while there.


All day I was surrounded by these four mighty and magnificent women who inspire, nurture and love me to no end. How lucky am I? Together, we made a version of the gluten-free scones you’ll see below as well as some delicious frittatas.


Food is always best when made with love and enjoyed in good company. All of that was abundant and then some. We gabbed for hours while dining al fresco on a Brooklyn co-op rooftop. Heaven on earth.


IMG_5301


I rounded out the weekend spending time with one of my other very best friends from childhood, Court. Actually, let’s call her my sister. Much more appropriate for our bond. We’ve known each other since age four and no matter how long we go in between visits, it feels like we’ve never skipped a beat.


While waiting for her arrival at an amazing Jewish Deli somewhere in lower Manhattan, I decided to express my joy for a weekend well spent with a little urban hand-standing. What else is a yogi to do?


IMG_5265


I could regal you with all the mundane details of what made that weekend so magical in my mind, but instead I’ll simply suggest you try out these Rosewater Raspberry Scones and taste for yourself some of the love and jamm I brought back with me from NYC.


IMG_5305

Rosewater Raspberry Gluten-Free Scones

Makes ~16  2 1/2-3″ scones.
Ingredients:
  • 2 1/2 cups Bob’s Red Mill Gluten-Free Biscuit Mix
  • 1/2 cup Gluten-Free Rolled Oats
    3/4 cup 2% or Whole Milk (note: you can substitute 1/2 cup unsweetened almond milk + 1/4 cup plain coconut milk yogurt to make this vegan)
  • 10 Tbs butter, cold and cubed
  • 1/4 cup Rosewater
  • 1 large egg
  • 1/3 cup cane sugar
  • Zest of one lemon
  • 1 1/2 cups fresh raspberries
  • Optional: 2-3 Tbs Milk for basting
  • Optional: sprinkle of corse sea salt

Directions:

  1. Preheat oven to 350 degrees Fahrenheit.
  2. Combine dry ingredients in a large bowl. Blend with butter cubes using a pastry cutter. You can also use your finger to pinch the butter into the flour mixture if you don’t have one.
  3. In a separate smaller bowl, whisk together milk, egg, rosewater, zest and sugar.
  4. Combine the wet and dry ingredients in the larger of the two bowls. Knead with your hands until dough is combined. It may be a bit chunky/flaky, but that’s good for scones.
  5. Fold in raspberries until evenly distributed.
  6. Shape into small round disks, approximate 2 – 2 1/2″ in diameter. Place on a lined baking sheet 1″ apart.
  7. Baste raw biscuits with a smear of milk, then sprinkle lightly with corse sea salt.
  8. Bake at 350 degrees for 22-26 min, or until the tops turn golden and a toothpick comes out clean.

Oatmeal Chocolate Cookies

Sugar is not the devil, but it’s no secret that most of us overindulge in it – sometimes without even realizing. In moderation, sugar can (and likely will) be included in a healthy diet. The problem is that most of us get our sugar from processed foods like candies, cookies and soda. True, homemade treats aren’t necessarily as convenient as store-bought, but 9 times out of 10 they’re better for you and your family. These Oatmeal Chocolate Cookies take it to the ‘alternative’ extreme of gluten-free and vegan, but even a homemade batch of buttery chocolate chip cookies is a healthier options than Chips Ahoy. Take baby steps first if you’re kicking a processed sugar habit before making your way to the wild side of chia seeds and raw coconut sugar in your baked goods. For those of you that are already on the natural foods path, these cookies are a tasty treat that you can get away with eating for breakfast every now and again. That’s right, chocolate for breakfast.

Oatmeal Chocolate Cookies

Vegan Oatmeal Chocolate Cookies

{makes 12 cookies}

What You’ll Need:

  • 1 medium banana (really ripe)
  • 1/4 cup apple sauce
  • 2 Tbs almond butter
  • 1 cup gluten-free rolled oats
  • 2 oz 100% cocoa dark baking chocolate
  • 2 Tbs coconut palm sugar (or 1 Tbs raw cane sugar)
  • 2 Tbs chia seeds
  • 2 Tbs dried, unsweetened cherries (optional)
  • 2 Tbs unsweetened, finely shredded coconut (optional)
  • 1/4 tsp sea salt

How to Make Them:

  1. Preheat oven to 350 F. Line a baking sheet with parchment paper or a baking mat and set aside.
  2. In a large bowl, add wet ingredients and mix until smooth. In the same bowl (no need to make two messy for this one), add your dry ingredients and mix until well-combined.
  3. Roll 1 Tbs of the mixture into 1″ balls and place onto prepared baking sheet, using your finger to press down the center of each one. Make sure there’s at least 1″ of space between each cookie.
  4. Bake for 15 minutes. Remove from oven and allow cookies to cool on baking sheet for 5-10 minutes before transferring to a baking rack to cool completely.

Store in an airtight container counter-top for up to a week, in the fridge for up to two, or in the freezer for up to three months.


Gluten-Free Pie Crust

Whether you are one of the estimated 3 million Americans living with Celiac Disease, have a known allergy or sensitivity, or are just curious to see how you might feel, making the switch to a gluten-free diet isn’t easy. Gluten hides in sneaky places like salad dressings, soups and even cosmetics. Beyond deciphering which food and beauty products are truly gluten-free, we all still want and need to enjoy life, and a big part of that big picture happiness is eating. That’s why one of my main nutrition counseling aims is to help those that want or need to be gluten-free learn how to shop and cook without sacrificing on flavor and enjoyment.

Let’s face it, life without bread, pancakes, pasta and most desserts would be pretty devastating for me and most people. Luckily, there is so much culinary creativity out there these days that you can have your gluten-free cake and eat it too. While I’m not tackling an actual cake in this post, I am bringing you the foundation of endless sweet treats: Gluten Free Pie Crust. This crust is light and flaky and can be made vegan by swapping coconut oil for butter. Fill it with your favorite seasonal fruit, a hint of healthy sugar (coconut palm sugar, agave, real maple syrup), a squeeze of lemon and some fresh herbs for a surprising and yummy twist and you’ll forget you’re eating something considered “alternative.”

Gluten Free Pie Crust

Gluten Free Pie Crust

What You’ll Need:
  • 1 cup spelt flour (or your preferred gluten-free flour)
  • 1/2 cup almond meal
  • 1/2 cup organic butter or coconut oil
  • 1-2 tsp coconut palm sugar or cane sugar
  • 1/2 tsp sea salt
How to Make It:
  1. Soften butter or coconut oil in microwave until just melted.
  2. Mix all dry ingredients together in a large bowl. Add your liquid and mix again.
  3. Form into a ball and refrigerate for at least a half hour (you can also freeze this for up to 3 months).
  4. When ready to bake, remove from refrigerator and place between two pieces of parchment paper. Roll it to desired thickness with a rolling pin. Drape the flattened dough over your preferred pie dish or tart pan. Don’t worry if the dough falls apart a bit, just press it into all corners and all the way up to the rim and make sure it’s distributed evenly so it cooks through.
  5. Bake at 400 F for 10 min on its own then reduce to 350 for another 35-40 min with your desired filling inside.

Saffron Fennel Bread

For the past 6 months, I have had a little golden packet of a special spice called saffron staring back at me from my kitchen cabinet. Saffron has a complex flavor that is often used in French bouillabaisse, Spanish paella, Milanese risotto, and many Middle Eastern dishes. I called it a “special” spice because not only is it quite pricey, but a little goes a long way when it comes to Saffron’s audacious effects on the palette.

image_1

Good news for all you natural remedy lovers out there! According to my girl Oprah, a 2008 study found that 76% of women who took daily saffron supplements reported a 50% drop in PMS symptoms like mood swings and fatigue (your welcome, in advance to the men in our lives). The spice has also been linked to the alleviation of mild to moderate depression. According to another study, saffron supplements were as effective as a common antidepressant in reducing symptoms related to depression.

This taste tantalizing and feel-good spice met its maker last weekend when I decided to dust off my dutch oven and get back to my bread baking roots. It all started because I realized I was in need of some bread to accompany two upcoming recipes–my meatless Monday Sweet Potato Bean Burgers with Maple Chipotle Mayo, and my slow-cooker Tuscan Lentil, Barley, and Kale Soup. Rather than running out to the store for a pre-made loaf, I got out my flours and yeast and got to cooking. I’ve been enjoying the bread for the last week and saved half in the freezer for when my schedule gets hectic with work travel. Give it a go and add a little something “special” to your sandwich or soup entree.

Saffrom Fennel Bread

What You’ll Need:

  • 1 1/4 cups warm water
  • 1 tbs active dry yeast (or one packet)
  • 1 tablespoon raw cane or coconut sugar
  • 2 cups unbleached, bread flour (plus a little more for kneading)
  • 1 cup whole wheat flour
  • 1/2 tbs kosher salt
  • 1 tbs whole fennel seeds
  • 1/8 tsp ground saffron
  • 1/4 cup cornmeal (for coating)

How to Make It:

  1. In a large bowl, mix water, yeast, and sugar. Add 1 cup of bread flour and stir until blended.  Wait 5 minutes.
  2. Once the mixture is slightly foamy, add salt, fennel seeds (crushing them lightly in your hand as you sprinkle them in), and saffron, and stir to blend. Add remaining cup of bread flour and all the whole wheat flour, little by little.  Mix the dough until it is too stiff to stir with a spoon.
  3. Place your dough on a lightly floured work surface and knead with your hands, adding additional bread flour when the dough gets too sticky. Knead until dough is smooth and consistent in texture, about 8-10 minutes.
  4. Place dough in a clean bowl, cover with plastic wrap, and let rise at room temperature until doubled in size (approx. 1 hour).
  5. Dust a baking sheet with cornmeal. Punch down the dough while still in its bowl, then form it into a firm ball and set on baking sheet. Cover with a dry cloth and let rise again until doubled in size (approx. 1 hour).
  6. About 40 minutes into the second hour, preheat the oven to 400°F with your dutch oven inside.
  7. 20 minutes after preheating, give your dough a good coating of cornmeal allover, then place it in the center of your (hot!) dutch oven. Bake bread covered for about 35 minutes, then uncovered for an additional 10 minutes or until golden brown. Set on a rack to cool for at least 20 minutes before slicing.

Don’t ya like Bran Muffins?

I love muffins. We all do. On the contrary, not many of us love bran muffins, but we should. Here’s why: bran–the outer layer of grains like oats, wheat and rice–is made of insoluble dietary fiber. Bran is good for your GI tract, is a pro-biotic food (meaning it has natural antibacterial fighting properties), and helps in combating heart disease. I feel fairly confident that I’ve found a way to make bran muffins mo’ than nutritious, and dare I say delicious. Not only that, but I’ve made them low-fat by substituting a ripe banana for oil, nutrient-rich by using whole wheat flour and almond meal in lieu of refined white flour, and dairy-free by trading out buttermilk/yogurt for almond milk. Eating is believing, so enjoy!

AMY’S BANANA BRAN MUFFINS:

Ingredients:

  • 2 cups wheat bran
  • 1 1/2 cups currants
  • 1 cup water
  • 1 cup unsweetened chocolate or vanilla almond milk
  • 1 tbs orange zest
  • 1/2 cup Demerara sugar (or pure cane sugar)
  • 1 (very ripe) banana
  • 2 large eggs
  • 1/2 cup whole wheat flour
  • 1/4 cup almond meal
  • 1 teaspoon baking powder
  • 1 teaspoon baking soda
  • 1/2 teaspoon salt
  • 1/2 cup shredded (unsweetened) coconut – optional

Instructions:

  1. Preheat the oven to 350°F. Line a 12-cup muffin pan with paper liners or grease lightly with oil (I use the spray kind).
  2. Spread the wheat bran on a baking sheet and toast in the oven for 6-8 minutes, being careful not to let it burn!
  3. Let the bran do it’s thing while simultaneously heating the currants with 3/4 cup of the water for 10 minutes, or until the water is mostly absorbed. Puree the raisins with the remaining 1/4 cup of water in a food processor or blender until semi-smooth (I like to keep some whole or semi-whole currants in there for texture).
  4. Mix together the toasted bran and almond milk. Add in the currant puree, orange zest and Demerara sugar. Stir in the mushy banana and two eggs.
  5. In a separate bowl, mix together the flour, almond meal, baking powder, baking soda and salt. Fold into the wet ingredients and stir until everything comes together. Mix in the coconut (you could also add walnuts, pecans, or even chocolate chips here!)
  6. Spoon the batter into the muffin pan, mounding the batter in each one.
  7. Bake for 25 to 30 minutes, or until the muffins feel firm in the center.
  8. Let cool for 10-15 minutes then remove from the pan.

Enjoy immediately or freeze for up to 3 months. They are grrrreat for breakfast with a cup of coffee or tea and some fresh fruit. Bon appetit!

P.S. Just in case you didn’t quite catch the reference insinuated by the title: http://muffinfilms.com/psst.html. Psst!