Spicy Cucumber-Kohlrabi Gazpacho (gluten-free and vegan)

Cucumber-Kohlrabi Gazpacho

You know those times when you think you’re eating something really healthy and then you realize there’s all kinds of hidden food bombs lurking within? Gazpacho might just be one of those great deceivers. It is for me!

Every time I eat a light, delicious gazpacho I forget that most of the time they contain stale bread as a thickening agent. The horror! Now, I’m not gluten-free – in fact I make my own sourdough bread every other week and eat the darn stuff daily – but I don’t like feeling duped by my soup.

In light of this sense of gastronomic justice, I experimented with using Kohlrabi – German for “cabbage turnip” – as a thickening agent…and it worked!

Kohlrabi is not a root vegetable but in fact a member of the brassica family – along with brussels sprouts, broccoli and cauliflower. It grows above ground and is loaded with minerals like copper, potassium, manganese, iron, and calcium, as well as vitamins, such as vitamin C, B-complex vitamins, vitamin A, and vitamin K. It’s flavor  is – in my opinion – unremarkable. So, dress it up in cucumber and spice and let’s call it a day!

Move Well DC - Cucumber Kohlrabi Gazpacho

Spicy Cucumber Kohlrabi Gazpacho

{Makes 4 servings.}

Ingredients:

  • 1 bulb of kohlrabi
  • 2 large organic cucumbers
  • 1 1/2 cups unsweetened plain almond milk
  • 1 serrano chile
  • 1 Tbs champagne vinegar (or rice vinegar)
  • 1/4 cup good olive oil
  • Juice of 2 limes (plus the zest of 1)
  • 1 large clove of garlic
  • Sea salt and pepper to taste
  • 1/2 cup toasted slivered almonds (for garnish)
  • 1/2 cup basil (for garnish)


Directions:

  1. PREP: Trim, peel and roughly chop the kohlrabi and cucumbers. Set aside a half a cup of the cucumbers and chop that portion into small cubes. Seed and halve the serrano. Set aside one half and slice thinly for garnish later. Peel the garlic. Cut the basil into small ribbons and set aside for garnish later.
  2. ASSEMBLE: Place all ingredients except the slivered almonds and cucumber, serrano and basil you have set asside for garnish in a high-speed blender. Purée until smooth (note: if you have an older blender you may need to strain the gazpacho with a skimmer or mesh bag to eliminate inconsistencies in texture).
  3. SET: Pour into an airtight container and refrigerate for at least an hour (or up to overnight!) before serve to allow the flavors to meld (note: it will get spicier with time).
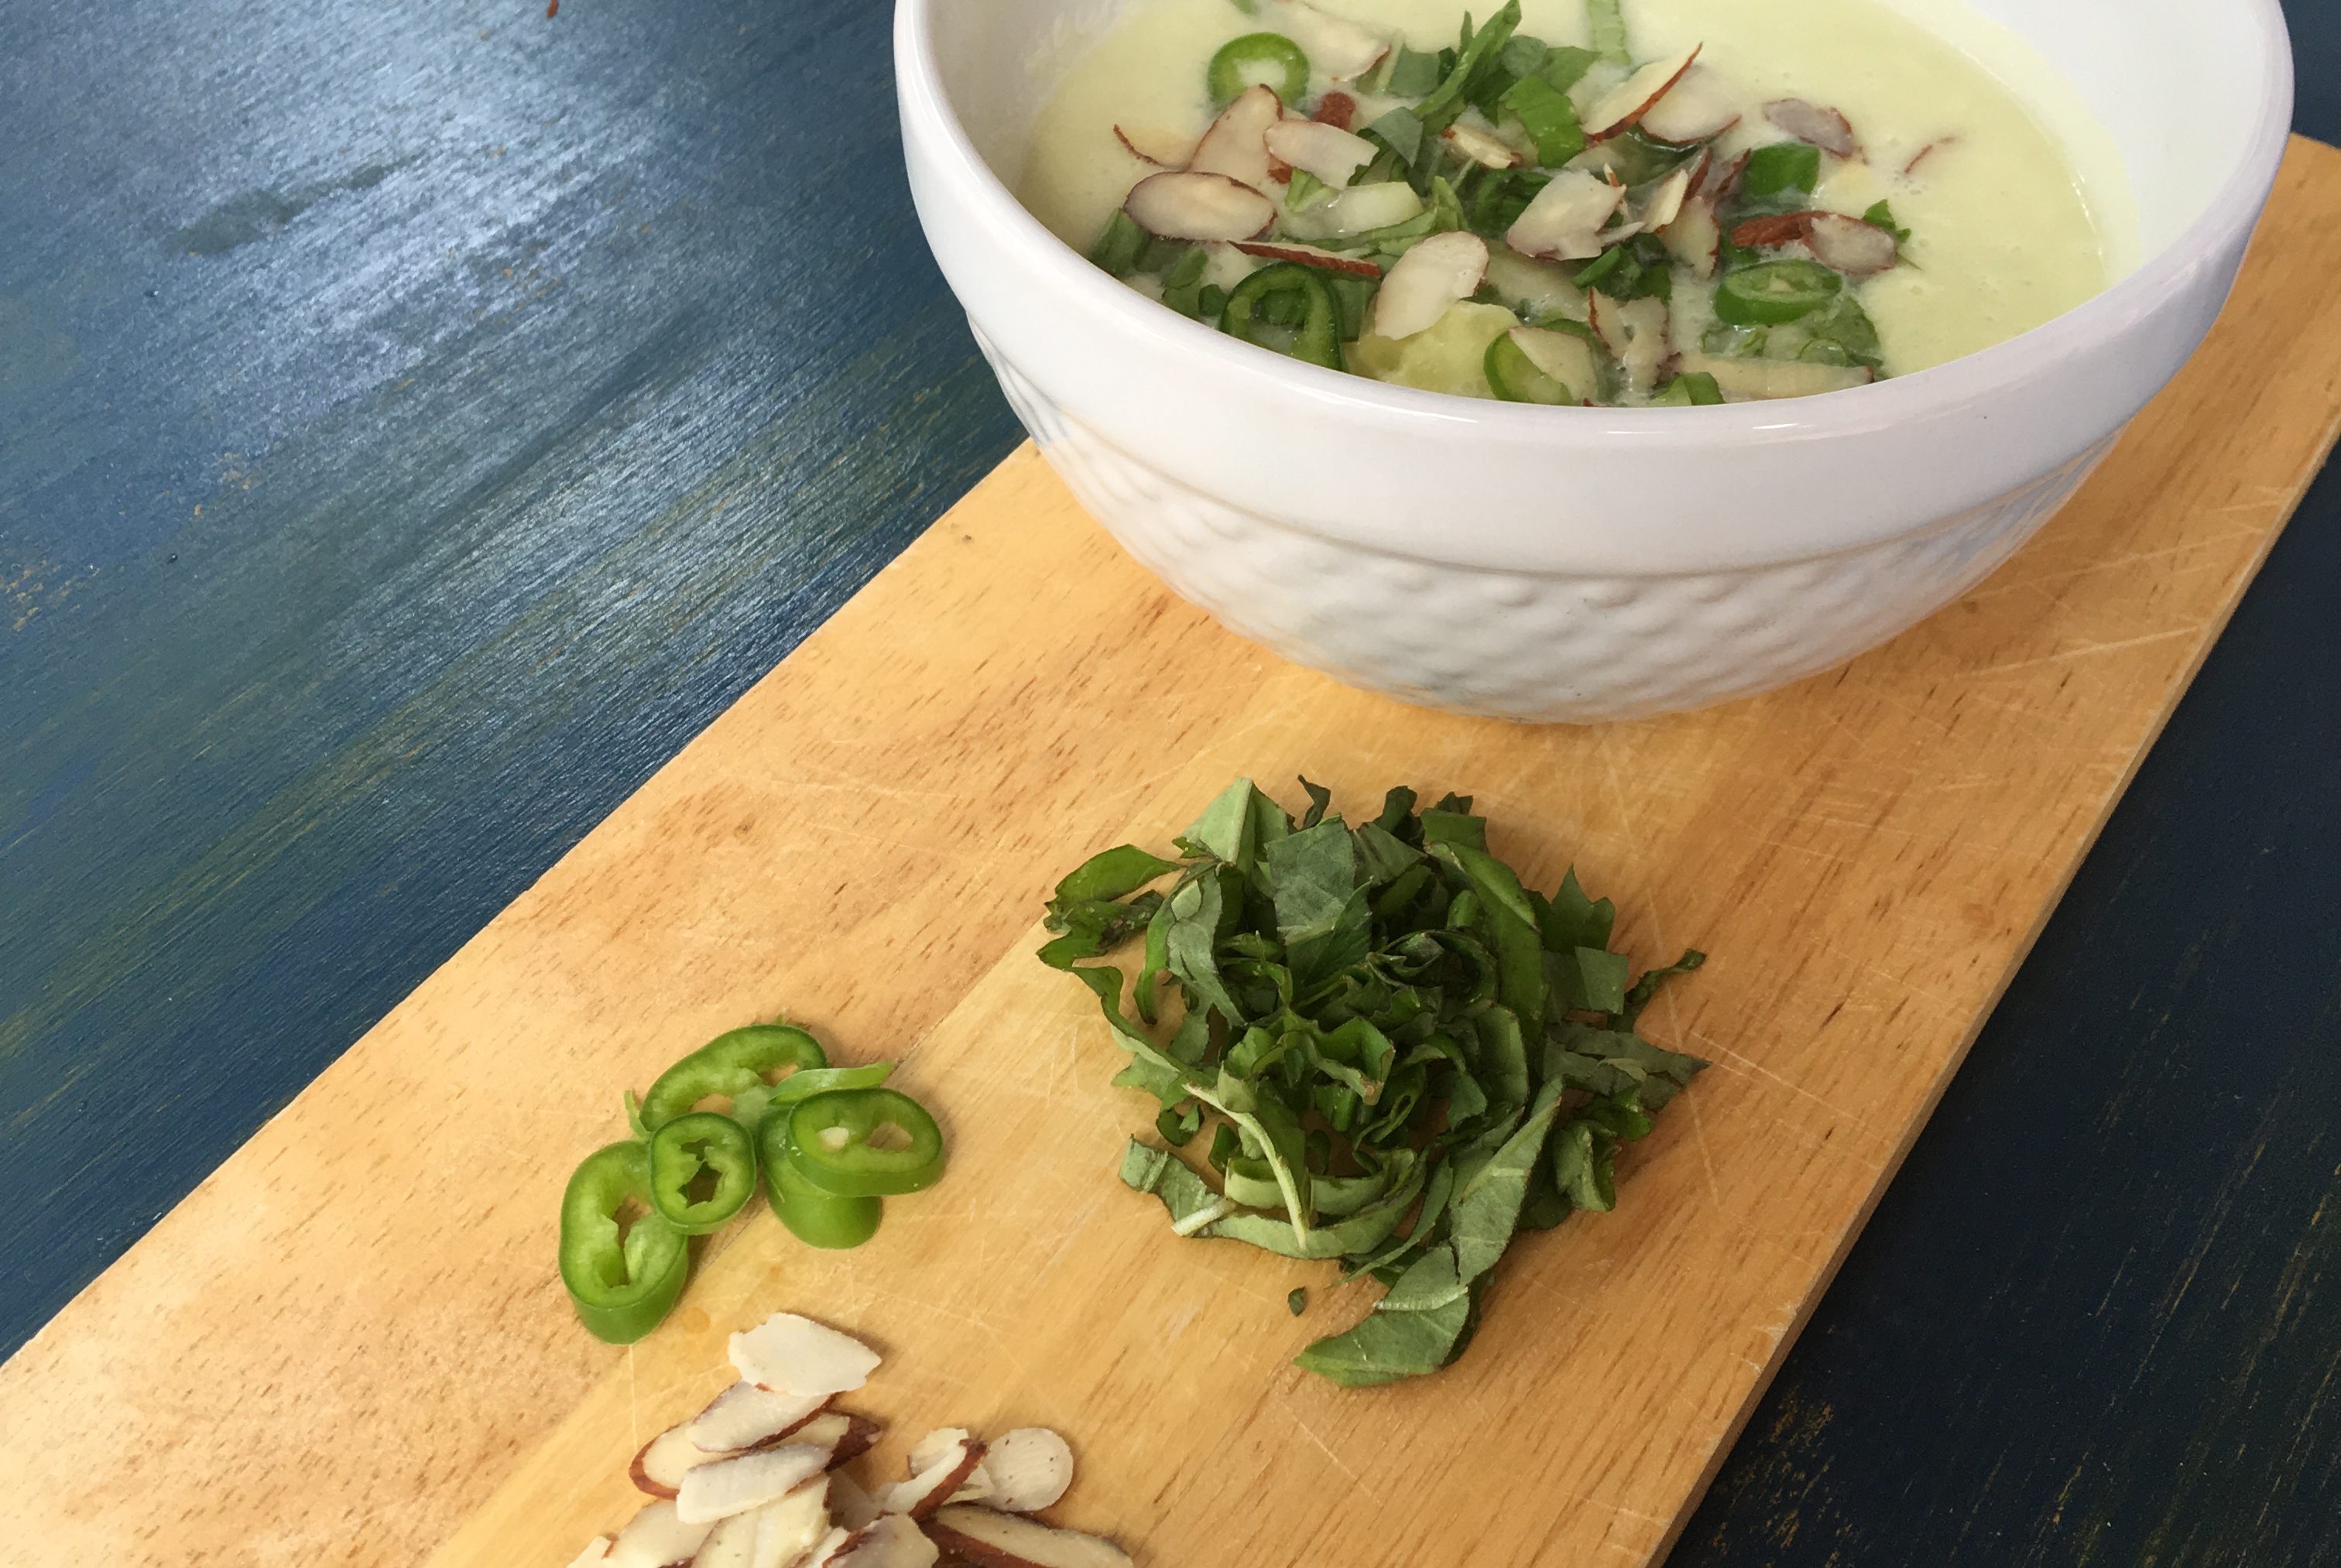
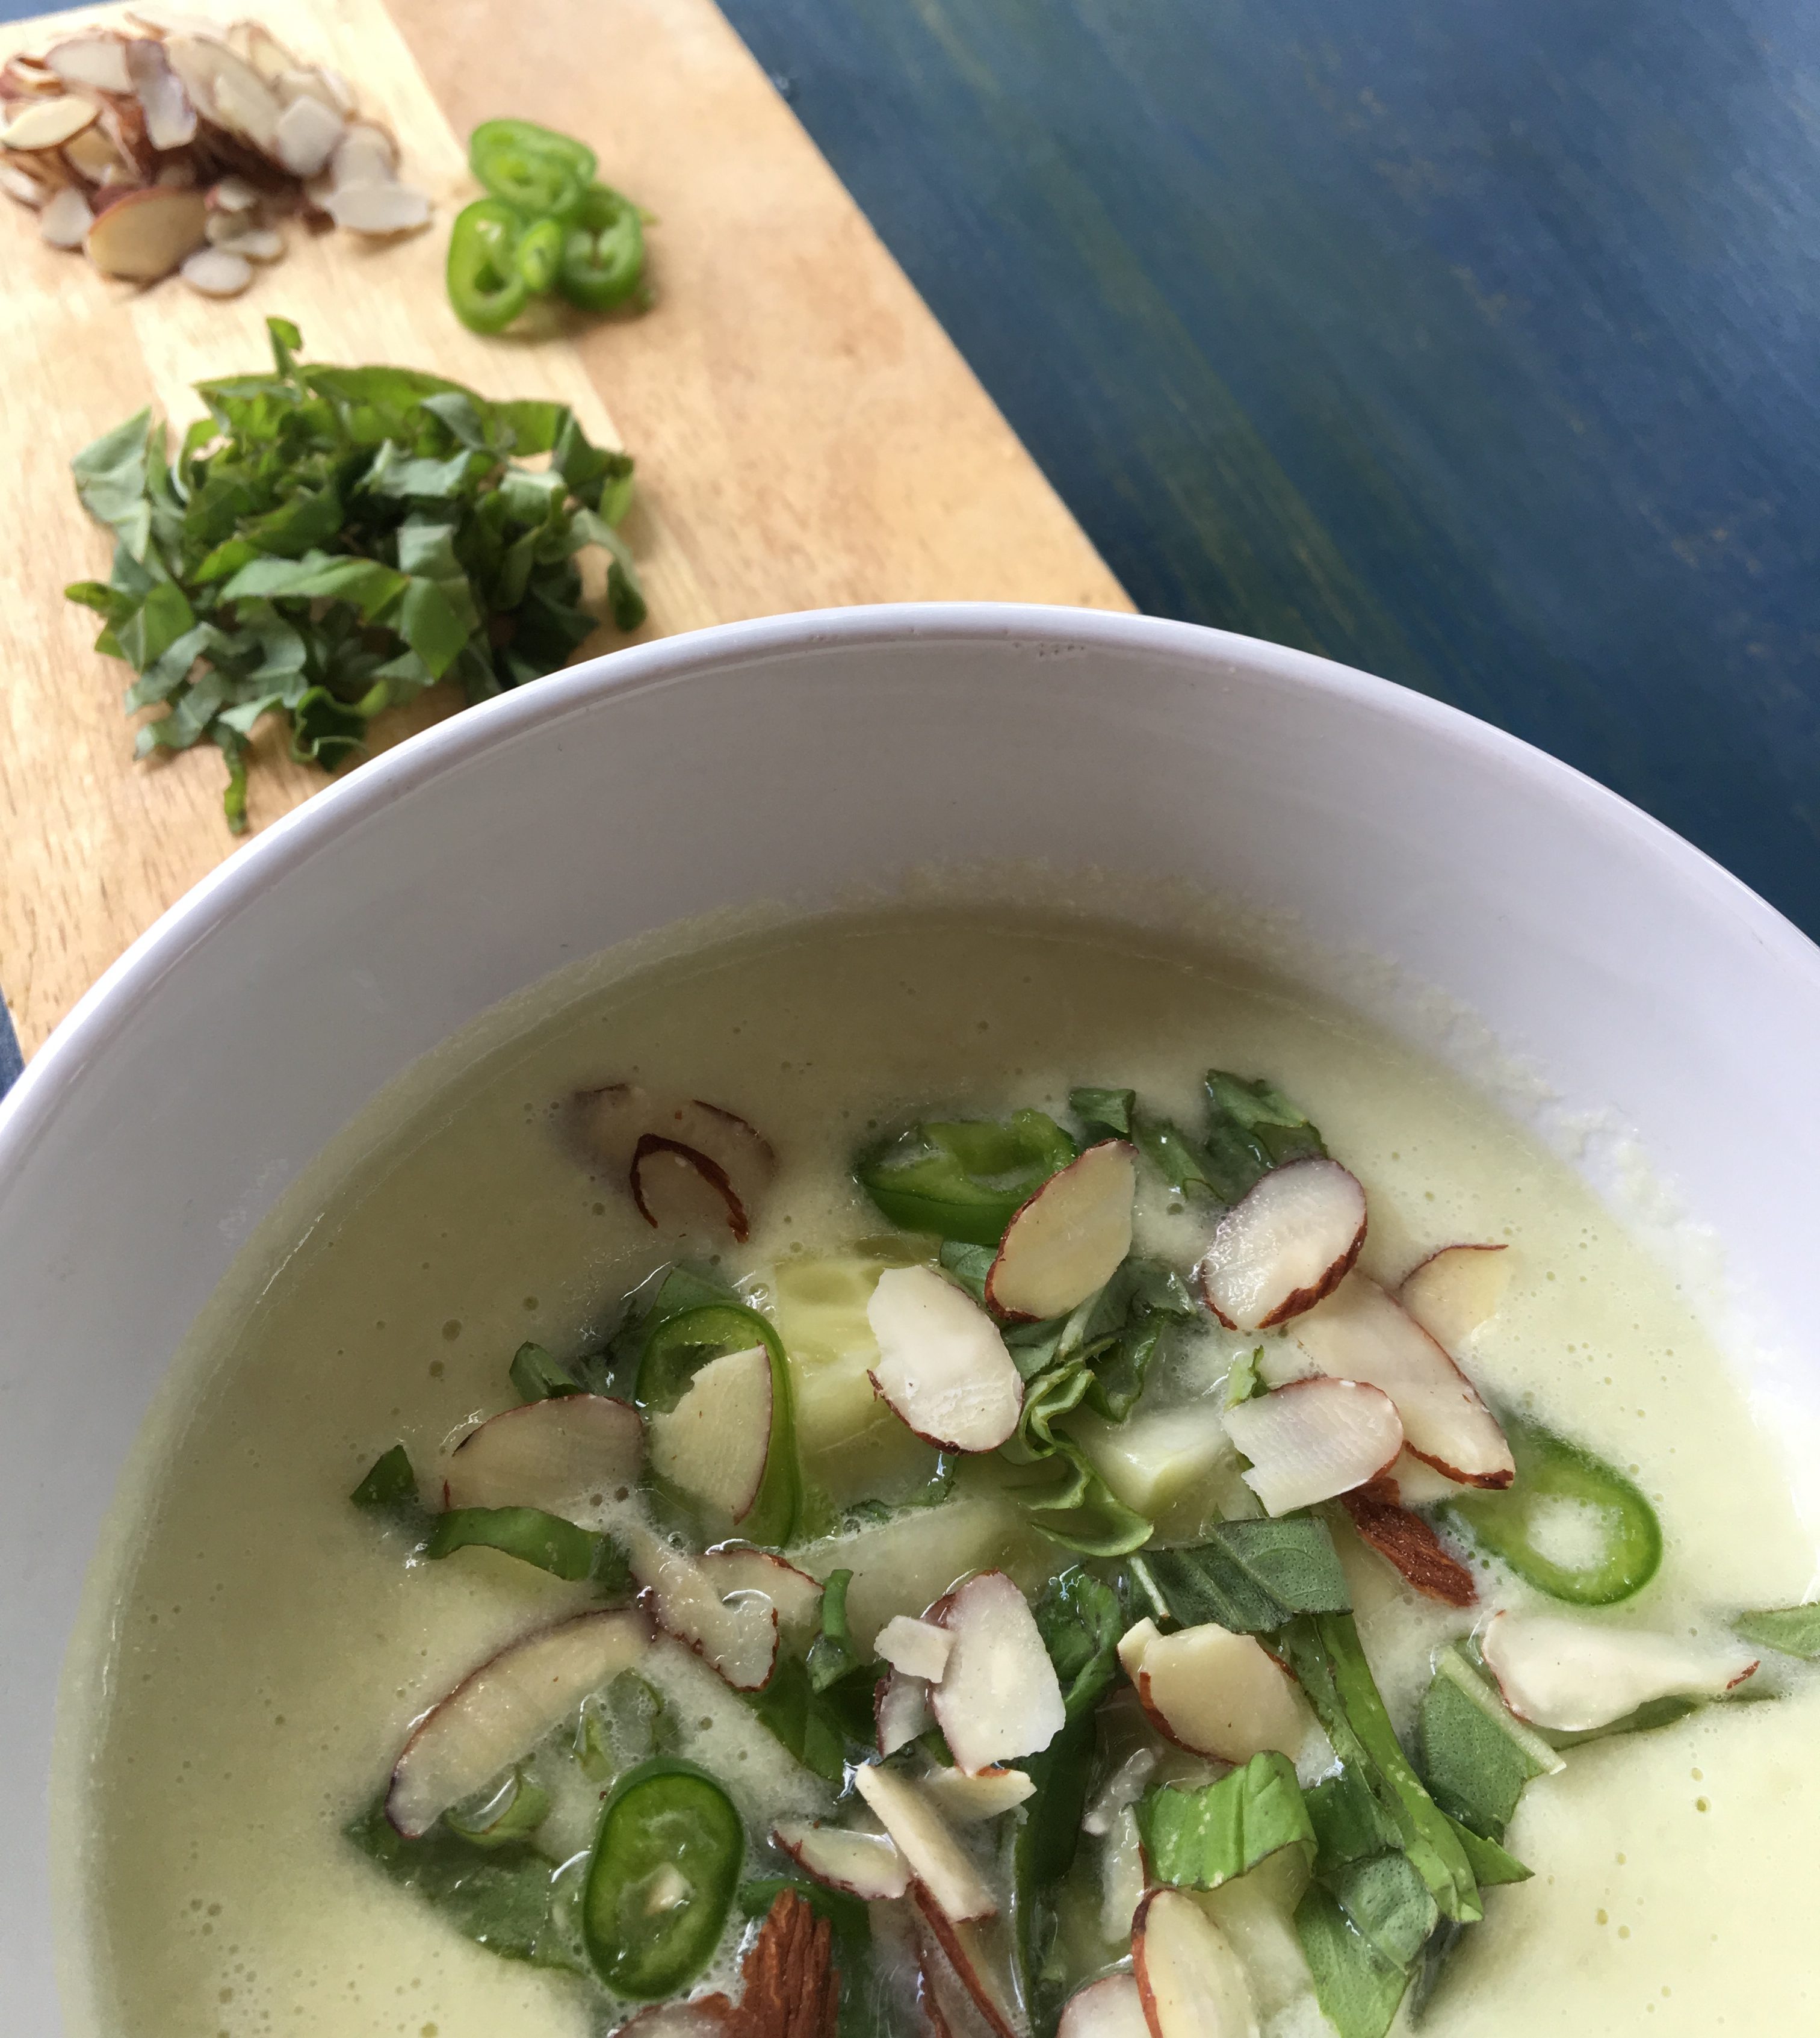
  4. SERVE: Place 2 Tbs of cubed cucumber in each bowl and ladle gazpacho on top. Garnish with 2 Tbs of basil ribbons, 2 Tbs of slivered almonds and serrano slices to taste. Drizzle a little extra olive oil and dust with freshly ground black pepper for even more taste impact.


Slow-Cooker Pulled Chicken

We live in a busy world and my clients are always listing time, convenience, and budget as their biggest constraints on healthy eating. When cooking is the last thing you want to think about, the amazing slow-cooker is your best friend. First introduced to the world in 1950 and mass-marketed in the 1970s, this piece of kitchen equipment has stood the test of time and is a staple in many a household. In most cases, you truly can dump ingredients in the large ceramic vessel, cover, and forget about it for the day – coming home to a homemade meal, house that smells divine, and still have time to spend with your family and friends.


This pulled chicken recipe is so easy. The only prep you have to do is mince the garlic and adobo pepper and thinly slice the scallions. If you’re feeling extra lazy, buy minced garlic in a jar. Serve it with a couple corn tortillas, cabbage slaw with a vinegar base, fresh avocado slices, and cilantro leaves for a healthy and easy dinner perfect for staying in or entertaining a crowd (chicken thighs keep the cost down!).

Slow Cooker Chicken Carnitas

SLOW-COOKER PULLED CHICKEN

Ingredients:

  • 4 pounds boneless skinless chicken breasts
  • 1 cup white wine
  • 1 bunch of scallions, thinly sliced using green and white parts
  • 4 cloves garlic, peeled and minced
  • 2 chipotle in adobo sauce, minced
  • 1 Tbs cumin
  • 2 tsp chili powder
  • 1/4 cup apple cider vinegar
  • Sea salt and pepper to taste


Directions:

  1. Add the chicken, wine, scallions, garlic, chipotles, cumin, black pepper, chili powder, and salt to the basin of a large slow cooker.  Mix with a large wooden spoon to coat chicken in sauce and spices.
  2. Cook on low for 7-8 hours until the chicken is tender and shreds easily with two forks.
  3. Serve immediately with tortillas or atop brown rice and greens in a bowl.
  4. You can refrigerate this recipe in an air-tight for up to 5 days, or freeze it in an air-tight container for up to 3 months (be sure to label it!).


Big Batch Breakfast (Part Deux): Healthy Veggie & Cheese Egg Muffins

Breakfast just got a whole lot easier. If you’re on the go as much as I am, it always pays off to spend a little extra time over the weekend to prepare some grab-and-go meals that will keep your full and focused throughout the week no matter what calendar cluster-Fs may arise.

For the past two weeks I’ve been making a big batch of healthy egg muffins on Sunday afternoosn, switching up the vegetables and accoutrements to keep things interesting. Below you’ll find my current favorite, but you can check my Instagram account for a recipe with asparagus, summer corn, and grape tomatoes. You can’t go wrong with either!

Healthy Baked Egg MuffinsBig Batch Breakfast (Part Deux): Healthy Veggie & Cheese Egg Muffins

Makes 12 egg muffins, or 6 servings.

Ingredients:

  • Butter, coconut oil or nonstick cooking spray, to coat pans – or, use silicone baking cups
  • 8 large eggs
  • Splash of milk (can use nut milk if preferred)
  • Generous pinch of sea salt and ground pepper
  • 2 sprigs of fresh thyme, de-stemmed and minced
  • 2 tsp olive oil
  • 2 cups kale, cut into thin ribbons
  • 1/2 cup sweet & spicy cherry peppers
  • 1/2 large red onion, finely chopped
  • 1 clove of garlic, minced
  • 3/4 – 1 cup shredded parmesan

Directions:

  1. Preheat the oven to 350°F.
  2. Crack eggs into a large bowl and whisk with the milk, thyme, salt and pepper.
  3. Grease a 12-cup muffin pan as desired.
  4. Sauté red onion in olive oil for 5 minutes over medium-high heat with a pinch of salt. Add kale, sweet and spicy pepper, and garlic and sauté another 5-7 minutes.
  5. Divide veggie mixture and cheese between each muffin cup, then carefully pour eggs in until muffin tins are almost full – leaving about a 1/4-inch space.
  6. Bake for 20-25 minutes or until a wooden pick inserted in the center of a muffin comes out clean. The egg muffins will look like soufflé when they come out of the oven, but they will sink after a few minutes. Let them cool for a few minutes before using a rubber spatula to carefully remove each muffin.

Notes:

  1. Adapted from Popsugar.
  2. You can consume these immediately or let them cool, then transfer to a resealable plastic bag. They’ll refrigerate well for up to a week or freeze for up to three months.


Big Batch Breakfast: Blueberry Coconut Baked Oatmeal

Let’s face it, oatmeal can get pretty boring, but oats are so good for you – loaded with heart-healthy fiber and minerals. What to do?! Get baked. Err, get baking!

My baked oatmeal is super easy, cost-effective, and since it’s a big batch recipe you’ll be set for breakfast all week. Convenience – check! Taste – check! Healthy – check!

Plate of Blueberry Coconut Baked Oatmeal

Even if you don’t typically dig oatmeal, give this method a try. It changes the texture and fuses the flavors so you might just feel like you’re eating dessert, all the while you’re fueling yourself with clean energy for an active day. And best of all, there’s no added sugar so there’s no guilt with this breakfast decadence.

Go on, shake up your morning meal. It’s good to the last bite!


Blueberry Coconut Baked Oatmeal

Prep time: 10 mins Cook time: 40 mins Total time: 50 mins
Serves: 8 servings

Ingredients:

  • 1/2 cup roasted, unsalted pecan pieces
  • 1/2 cup toasted, unweetened coconut flakes
  • 1/2 cup hulled hemp seeds
  • 1/4 cup chia seeds
  • 2 1/2 cups old-fashioned oats
  • 1 Tbs ground cinnamon
  • A pinch of fine-grain sea salt
  • 2 cups fresh blueberries (frozen will work too – just defrost and discard any liquid)
  • 2 1/2 cups unsweetened almond milk
  • 2 large eggs
  • 2 Tbs melted coconut oil
  • 1 tsp vanilla extract
  • Optional toppings for serving: plain yogurt, maple syrup or honey for drizzling, and/or more fresh fruit

Directions:

  1. Preheat the oven to 375 degrees. Grease a 9×13-inch rectangular baking dish with butter or coconut oil.
  2. In a medium mixing bowl, combine the oats, nuts, coconut flakes, hemp seeds, chia seeds, cinnamon and salt. Whisk to combine.
  3. In a smaller mixing bowl, combine the almond milk, eggs, coconut oil and vanilla. Whisk until blended.
  4. Spread the berries evenly over the bottom of the baking dish then cover the fruit with the dry oat mixture. Drizzle the wet ingredients over the oats. Use a spatula in zig-zagging strokes across the surface of the wetted oats to smooth out the top and push any dry oats down.
  5. Bake for approximately 45 minutes, or until the top is golden (not burnt!). Remove your baked oatmeal from the oven and let it cool for a few minutes before cutting and serving.
  6. Serve with yogurt and a drizzle of honey for a more decadent and delicious breakfast experience!

Notes:

  1. This recipe will keep well in the refrigerator for up to 7 days.
  2. Recipe adapted from Cookie & Kate.

Labor Day Special: Summer Peach Gazpacho

Though summer is officially over as of today, I’m still basking in the beauty of its fresh, seasonal produce thanks to my weekly deliveries from From the Farmer. For most, soup and summer aren’t exactly two peas in a pod. There is, however, one exception to this dissonance–gazpacho. Gazpacho is technically any cold soup using raw vegetables and thus technically, as you’ll see, mine is not a purist’s gazpacho.

Last summer, I made another gazpacho on the blog that was a little more hearty and classic in its preparation and flavor profiles. This time around I wanted to usher in fall by adding a little more warmth and depth to this otherwise light and refreshing soup–don’t worry, it still delivers on those fronts too. By grilling the peaches and roasting the vegetables you bring out the natural sweetness of the produce and infuse the finished dish with a little je ne sais quoi.

Grilled Peaches via www.moar-fit.com | Amy Rizzotto

This gazpacho, much like my last, is still loaded with heart-healthy tomatoes. Tomatoes are an excellent source of Vitamin C, folate, potassium and, perhaps most significantly, the antioxidant compound lycopene. Lycopene has been linked to a reduced risk of cardiovascular disease and certain kinds of cancer.

Peach Gazpacho via www.moar-fit.com | Amy Rizzotto

Summer Peach Gazpacho

{makes 8 servings}

what you’ll need.

  • 2 large ripe peaches
  • 2 Tbs olive oil
  • 8 ripe tomatoes (roma, plum or small/medium round ones will do)
  • 4 cloves of garlic
  • 2-3 cups of water (depending on your preferred consistency)
  • 2 jalapenos
  • 1 red onion
  • 1 large bunch fresh cilantro
  • Juice of 2 lemons
  • Zest of one lemon
  • 1 bell pepper
  • 1 avocado
  • 2 Tbs sherry vinegar
  • Sea salt and pepper to taste
  • Optional: add 1-3 tsp cumin for a smoky flavor

how to make it.

  1. Preheat oven to 500 F.
  2. While oven is preheating, cut peaches in half and remove pit. Rub the cut side with a little olive oil. On a grill pan (or grill if you have one), grill peaches (cut side down) for 2-3 minutes over high heat.
  3. Toss jalapenos, garlic and tomatoes in 2 Tbs of olive oil and a little salt and pepper, and roast for about 10 minutes. This will vary depending on your oven, but look for the jalapenos to start to brown and the skin on them and the tomatoes should start to crack and possibly blister. Set aside to cool.
  4. While roasting veggies/letting them cool you can…(1) Prep your onion. Chop it in half. Set one half aside and dice the other into small pieces for garnish. (2) Wash and dry your cilantro. Set one cup (or a hearty handful) aside, stems and all. Chop another 1/2 cup for garnish, stems removed. (3) Zest one lemon, then juice it and one more (do this directly into your blender to save on clean-up). (4) Leave one half of your bell pepper whole, seeds removed. Dice the other half into small pieces for garnish. (5) Halve, pit and dice your avocado for garnish.
  5. When jalapenos are cool enough to handle, remove the stem and slice them lengthwise so you can get all the seeds out.
  6. Combine all ingredients (except those designated “garnish”) in a blender with 2-3 cups of water depending on your preferred consistency.

Note: this gets better the longer it sits in the fridge. It will store well for up to a week.

Second note: I like mine spicy so I usually leave about half the seeds from ONE jalapeno in. Any more than that and you should probably have some milk and cornbread on hand!

Zucchini Flower Fritters (Dairy-Free)(Gluten-Free)

With summer in full swing, farmers markets are overflowing with delicious produce and fresh cut flowers. What could be better than a farmers market find that is both food and flower? Nothing, clearly. So when I locked eyes on the beautiful and edible zucchini flowers last weekend, I knew immediately I had to have them. These vibrant orange blossoms can be eaten raw or cooked and are a favorite in Mediterranean cuisine. Into the tote they went, merrily whisked back to the MOARyoga shoebox test kitchen. Equipped with the best of nature’s bounty, I set out to prepare a fun finger-food hearty enough for a meal but still light enough on the palette for a hot summer night.

…the result…

IMG_4430

Zucchini Flower Fritters

What You’ll Need:

  • 2 tbs olive oil
  • 1 shallot, minced
  • 2 cloves garlic, minced
  • 1/2 red bell pepper, finely chopped
  • 1/2 roasted poblano, finely chopped
  • 1 jalapeño, seeded and finely chopped
  • 2 eggs
  • 1 cup cooked quinoa
  • 1/3 cup garbanzo bean flour
  • 3 tbs nutritional yeast
  • 1 tsp adobe chili powder
  • 1/2 tsp salt
  • 1/4 tsp pepper
  • Lemon wedges (for garnish)

For the Beer Batter:

  • 1/2 cup garbanzo bean flour
  • 1tsp salt
  • 1 tbs olive oil
  • 1/3 cup chilled gluten-free beer
  • 1 egg
  • Canola or grapeseed oil for frying

IMG_4443

How to Make Them:
  1. In a medium frying pan, saute shallots in olive oil over medium heat until translucent. Add garlic, red pepper, poblano and jalapeño. Saute another 3-5 min. Remove from heat and let cool.
  2. In a separate bowl, mix cooked quinoa with nutritional yeast, salt, pepper, chili powder and garbanzo bean flour.
  3. Add cooled veggie mix to your dry ingredients and mix to combine. Add eggs (whipped up in a separate bowl first) until everything comes together.
  4. Take zucchini flowers and use your fingers to remove any stamens from the inside of the blossoms. Rinse the flowers and pat dry.
  5. Using your fingers and/or a teaspoon to work a dollop of the quinoa mixture inside the blossom. Leave enough room at the top to twist the petals together, creating a neat little package with the flowers.
  6. Chill stuffed zucchini flowers in the fridge for at least 30 min.
  7. While that’s happening, prepare your batter. Mix garbanzo bean flour, salt, oil and gluten-free beer together in one bowl. In a separate bowl whip your egg vigorously until frothy. Combine the contents of the two bowls and stir until smooth.
  8. Remove flowers from fridge. Line a tray with paper towels.
  9. Fill a deep saucepan 1/3 of the way with canola or grapeseed oil, then heat on medium-high until a drop of water makes the oil hiss and spit (stand back!).
  10. Working in batches of four, slide the flowers one-by-one into batter. Allow any excess batter to drip off, then deep-fry for 4 min (flipping once) or until golden. Using a slotted spoon or tongs, transfer to paper towel-lined tray. Repeat until all flowers are frittered!
  11. Scatter with salt and serve with lemon wedges.
These fritters are light, gluten-free, dairy-free and delicious. Try dipping them in my Tomatillo Spicy Green Salsa for some added kick!

Zucchini “Fettuccine Alfredo” (Vegan) (Gluten-Free)

Growing up in a half-Italian household, there was no shortage of ricotta stuffed shells, eggplant parmesan, and creamy pasta dishes at family gatherings. You’d think I’d be naturally endowed with the ability to digest all that deliciousness. Sadly, like so many others, over the years I have lost the ability to properly digest lactose (a.k.a. I am dairy defunct). According to the NIH, “approximately 65% of the human population has a reduced ability to digest lactose after infancy.” So what’s an Italiana to do?

Thanks to creative cooks across the web and world, there are thousands of recipe alternatives out there for some of your favorite cheese and cream-heavy dishes. Ever since noshing on an amazing dish of dairy-free Fettuccine “Alfredo” in Austin, TX back in February I’ve been angling to make my own version that was both vegan and gluten-free. After reading countless recipes and making several attempts to fuse what I saw as the best elements of each, this is what I came up with…and it’s super tasty if I do say so myself!

Zucchini “Fettuccine Alfredo”

IMG_4359

What You’ll Need:

  • 1 cup raw cashews
  • 8 oz boiling water
  • 3-4 cloves garlic
  • 1/3 cup nutritional yeast
  • juice of half a lemon
  • 2 tbs olive oil
  • 1/4 tsp nutmeg
  • salt and pepper to taste
  • 4 small or 2 large zucchinis

How to Make It:

  1. Soak cashews in water overnight.
  2. Drain cashews and add to a blender or food processor. Add 8-oz of boiling water and blend until mostly smooth.
  3. Add remaining ingredients and blend until smooth and creamy.
  4. Adjust salt and pepper to taste. Let cool and store in the fridge for up to a week or use immediately (continuing to steps 5 and 6).
  5. Using a vegetable peeler, shave long slivers of raw zucchini into a bowl until you’ve used up the entire veggie. The strips should look like thin ribbons (see below).
  6. Toss zucchini with “Alfredo” sauce until well coated.
  7. Let marinate for at least 30 min so the sauce seeps into the “fettuccine.”

This can be served hot or cold. It makes for the perfect summer meal: very light, very healthy and, to top it off, very satisfying!

IMG_4363

Shaved Brussels Sprout Salad w/ Pine Nuts

  IMG_3326

Shaved Brussels Sprout Salad w/ Pine Nuts 

  • 12-15 brussels sprouts, shredded (yield 6 cups)
  • ½ cup pine nuts
  • 1 tsp olive oil
  • pinch of sea salt

1. Using  mandoline, shred brussels sprouts 1/8″ thick–yield should be approximately 6 cups. Place shredded brussels sprouts in a large colander and wash thoroughly.

2. Pre-heat oven to  350° F. Toss pine nuts in olive oil and salt and spread on a small baking sheet. Bake in pre-heated oven for ~5 min, checking frequently to be sure they don’t burn.

3. In a large bowl, combine shredded brussels sprouts, toasted pine nuts and lemon vinaigrette (recipe below), massaging the ingredients to thoroughly coat. Cover and refrigerate for at least 1 hour before serving.

IMG_3317

Lemon Vinaigrette

  • 1/2 cup olive oil
  • 4 tbs fresh lemon juice
  • 1 tbs minced shallot
  • 1 tbs corse Dijon mustard
  • 1/2 tsp grated lemon peel
  • 1/2 tsp honey
  • 1 tsp fresh thyme
  • salt & pepper to taste

1.Combine all ingredients in a small glass bowl. Whisk vigorously to combine.

IMG_3325